We remain fully operational. Our teams are working around the clock to ensure your deliveries continue safely.

DOWNLOAD THE APP


Copyright © 2025 Desertcart Holdings Limited
DOWNLOAD THE APP


Buy anything from 5,000+ international stores. One checkout price. No surprise fees. Join 2M+ shoppers on Desertcart.
Desertcart purchases this item on your behalf and handles shipping, customs, and support to Thailand.
🎬 Elevate your home cinema game—because your screen should be as ambitious as your binge list.
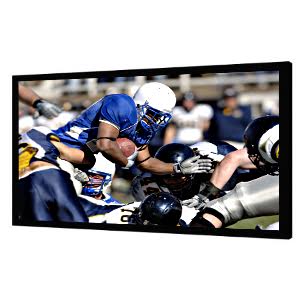
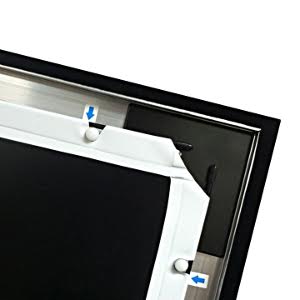
The Silver Ticket STR Series 110" fixed frame projection screen features a light grey 1.0 gain matte surface optimized for 4K/8K UHD, HDR, and Active 3D content. Its heavy-duty aluminum frame wrapped in black velvet absorbs ambient light, enhancing contrast and black levels. Designed for wall mounting with easy tension rod assembly, it supports long, short, and ultra-short throw projectors, delivering a professional-grade cinematic experience in a sleek 16:9 format.


| ASIN | B00PUQPIAG |
| Best Sellers Rank | #34 in Projection Screens |
| Brand | Silver Ticket Products |
| Color | Grey Material |
| Customer Reviews | 4.7 4.7 out of 5 stars (1,102) |
| Enclosure Material | Aluminum |
| Item Dimensions W x H | 100.75"W x 58.75"H |
| Manufacturer | Silver Ticket Products |
| Mfr Part Number | STR-169110-G |
| Model Number | STR-169110-G |
| Mounting Type | Wall Mount |
| Operation Mode | Manual |
| Screen Dimensions | 110 inches |
| Screen Finish | Matte |
| UPC | 763461679597 |
| Unit Count | 1 Count |
| Viewing Angle | 160 Degrees |
M**Y
A very good screen at an economy price.
I am really impressed with the image quality this screen provides. I have the Epson 5050UB projector in my living room with minimal room treatments. I will have blackout curtains on the windows, but don't plan to paint the walls or ceiling, which are currently white. I was concerned about ending up with a washed out image due to poor light control. I come from an 82" Samsung Q70R with excellent contrast, so black levels are important to me. Right away after assembling and hanging the screen, I was impressed with the contrast and black levels, even with light coming in through the windows. Once it's dark, the image explodes off the screen. The Revenant, followed by Ready Player One, both in 4K, looked amazing. The 5050UB is known for it's great blacks and contrast but this image is everything I had hoped for. I went with the light grey to give the black level a little boost and I am very pleased with the result. As far as colors and the rendering of bright daylight images, this screen and projector combo are a knock out. The sun through the trees in The Revenant made us want sunglasses. The dark scene detail is also amazing. Something even my QLED TV could never do. For those wondering, the screen was actually easy to assemble. Just be sure you have a large open area of floor and vacuum before you start. I was worried about the process, stretching the screen, but it really does go together nicely. The center support bar went in smoothly also. Note to the novices: don't forget to install the hanging brackets before you assemble the frame corners. I did forget and ended up having to make hanging brackets to fit the frame rather than disassemble it to install the hangers. All in all, it turned out excellent. I highly recommend the Silver Ticket light gray screen with the Epson 5050UB.
S**E
Fantastic screen! Highly recommend
Using for Ultra Short Throw projector. We decided on the grey screen. Amazing product. Easy to assemble, all pieces straight and true. All holes perfectly aligned! Absolutely no wrinkles in fabric. Beautiful black velvet frame that completely absorbs any light. Fast shipping. Excellent packaging to prevent any damage. Assembly was so easy. Just watch the excellent video from manufacturer right on Amazon site and it goes together in a snap. (Seriously, didn’t even pick up instruction manual. 😂). Longest part was measuring wall for mounting to make sure it was level. We predrilled holes into studs, but it comes with Sheetrock mounting screws as well. Picture is beautiful with rich vibrant true color and deep blacks. I was amazed by the quality of this product! Would definitely recommend! Update: This screen is still fantastic and a truly great value compared to other screens on the market. I contacted manufacturer to get gray screen fabric sample so I could match paint color for my wall. (There was no phone number, so I emailed them). Surprisingly, I got a response within 24 hours and received my screen sample within the week! So in addition to a fantastic screen and a great value, I felt compelled to add amazing customer service to my review! Thanks again Silver Ticket Products!
J**N
Easy decision here. Easily best bang for buck!
UPDATE 5-22-2017: I've used the grey, the silver and now the white material. I went from grey to silver because we have skylights and I was going for more contrast in the brighter environment. No complaints about the grey or silver, they did their job! Now that I can blackout the skylights, it's time for the best color screen in dark rooms; white! Since I kept the frame I just ordered the screen material only. A steal for theater quality, and can I just say, the staff is friendly, accommodating and quick to respond. Assembly is cake. K.I.S.S. is the idea here. It takes two people to carry the screen because of size, not weight. For assembly think about a trampoline; stretched tight along all edges. Rather than having pegs holding the edge of the screen, the pegs are holding a thin metal rod you slip inside all along the edge of the screen, edge to edge, on all 4 sides. Instead of a spiderweb effect with pegs stretching only where they're attached, the pegs hold the rod which pulls the entire length taught. It's flat as a drum! The process: Assemble the frame, face side down. Drape the material face side down. Slide the rods into the edges. Pulling taught to insert the pegs in the provided holes in the material provides the screen tension. with the rod on the outside of the pegs keeping it smooth and flat. Work your way around. Finally, insert the center bar to prop up the center span. Hanging isn't any more difficult than hanging a (big) picture. No studs are required, but easy to accommodate as the hanger holes are on sliders for 100% custom placement. Guestimate the left and right position of the hangers. Don't sweat exact measurements width-wise. Measure how far down from the top and up from the bottom of the frame you need your mounting hardware to be (about an inch) and place your two upper and two lower hooks/screws/nails. Place the frame where you want it. Have someone hold it at the bottom. Stand on them, or a ladder, and feel for the hangers, then slide the slider to the hanger. Easy peasy. Hold the top in as your helper lifts up and slides the sliders to the lower hangers and drop it back down. If you're anything but a rich home theater elitist, this is your screen company. End update********************** The perfect screen for the first time home theater owner, and an amazing value for everyone else. The review blog that brought me here was basically lamenting the $2000 screen they bought saying they would have purchased this one instead. The $2000 screen was technically better, but not $1700 better! Use that money for a nice receiver or speakers! Assembly was simple. I engaged my wife during the screen tensioning part, but you can do it solo without breaking a sweat. Everything fit, and the frame is solid. Installation: It's basically a big picture frame and only about 25lbs. I was fortunate in that I'm just resting it on a chair rail with minimal hooks to hold it to the wall. Studs aren't necessary, but using them is easy as you don't need to measure width-wise. The hangers slide easily, just measure an inch below the top of the frame and you're done.
L**Z
El producto es excelente aun que no es barto
C**G
Looks awsome picture quality is great i was useing a good quality white rollup screen a daylite screen its ok for the last 15 years but this sulver ticket light grey screen 120" has colour depth way better and contrast is excellent image sharpness is crisp n clear over all looks like a giant highend flatscreen tv now the old screen was no comparison to this worth the money wishbid got it years ago easy to put together the mounts that hook ro thecwall could be better there loose fiting but other than that its perfect svreen n perfect picture im useing a lg lazer long throw projector huw80 i rjink or something lol but the acreen is awsome if your thinking about it like i was for a long time dont wadte anymore time grom a white screen to thus no brainer its worth it thete is no wrinkles or nothing in screen it is flawless mint.
S**I
The instructions were spot on and after assembly the screen looks great.!
K**S
A lot to say on that incredible screen! I was using a rolled tab-tensioned 100" screen in my previous house and needed to switch to a fixed screen because my new Home Cinema is now dedicated. Let me say that the screen is of excellent quality. The Build is sturdy and everything feels strong and the screen feels premium in all aspect. I picked the "grey" version as my Sony projector is bright enough and I wanted to get the extra contrast. First time I projected on it I've been blown away literally! I'm not able to see any grainy issue and the picture is uniform and there are nothing to say other that it exceeded my expectations. Pros: - Picture quality is just fantastic - Expect a very good contrast and color accuracy - Easy assembly and can be done in about 1 1/2 hours - No hot spot in high brightness area. - Simple to hang on the wall and can accommodate most wall build Cons: - I tried hard but was not able to find any!
I**N
The screen arrived on the 1st day of the date range. It took only 3 days to get it shipped to Canada. This screen is actually pretty easy to put together. Just make sure you follow the instructions and take your time. I watched a few instructional videos on how to put this screen together first and that really helped. One recommendation that i would suggest is to install the fabric in all 4 corners 1st, diagonally opposite, if that makes sense. Same process for the top and bottom. The middle bar wasn't as hard to get in as I thought it was going to be. It has to go in at an angle but it's a little pliable so I pulled upwards and tapped it into place with a rubber mallet. I would also recommend installing the screws into the fall first and aligning the screen prior to installing the fabric. I marked the location of the screws on the wall with green painters tape and the location of the brackets and the screen with the same green tape. When it came time to mount the screen to the wall, all I had to do was line up the tape on the screen to the wall. This is my first venture into the world of projectors but I have to say that I'm blown away but how good this picture looks on this 120" screen. The photos really don't do it justice.
Trustpilot
2 weeks ago
2 weeks ago