We remain fully operational. Our teams are working around the clock to ensure your deliveries continue safely.

DOWNLOAD THE APP


Copyright © 2025 Desertcart Holdings Limited
DOWNLOAD THE APP

Buy anything from 5,000+ international stores. One checkout price. No surprise fees. Join 2M+ shoppers on Desertcart.
Desertcart purchases this item on your behalf and handles shipping, customs, and support to Thailand.
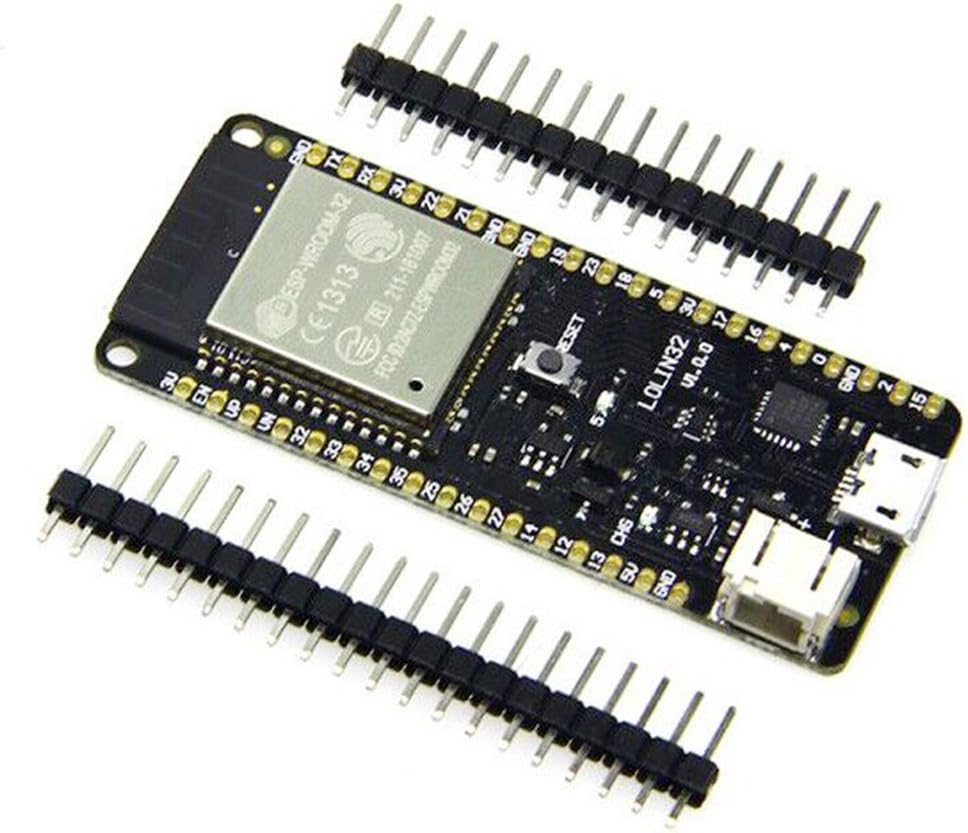
Lithium battery interface (battery not include), 500mA Max charging current. Product specifications: Size: 57*25*14mm Weight: 8g Chip: ESP32-32 Working voltage: 3.3V GPIO: 28 Digital I/O Pins: 26 Analog I/O Pins: 12 Maximum computing speed: 240Mhz USB chip: CP2104 Storage capacity: 4MBytes Power plug: PH-2 2.0mm Connection: Micro-USB Package Included: 1 x 16pin 1 x 20pin 1 x ESP32 Board Review: How to have reliable downloads - Wonderful board for hobby projects.. I have purchased 6 of them and never had any issues. Easy to use with either the Arduion IDE or PlatformIO. A number of people have reported that downloading is hit or miss. If you put a small capacitor between GND and EN, downloads will work everytime. Review: Getting sketches to upload and using additional serial ports - This board is different from many Arduino boards you may have used. It took me a week or two searching the internet to learn how to get it to work. First, the battery connector is reversed polarity compared to most LIPO batteries, so you may need to swap pins on the battery connector (Red wire to + on board). To upload sketches from the Arduino IDE, you must ground GPIO 0, then press the reset button. You may need to unplug are plug in the USB cable to get this to work. The serial monitor will display "waiting for download". Then you can upload a sketch, and when finished, unground the GPIO 0 pin and press the reset button again to run the sketch. /* * There are three serial ports on the ESP known as U0UXD, U1UXD and U2UXD. * * U0UXD is used to communicate with the ESP32 for programming and during reset/boot. * U1UXD is unused and can be used for your projects. Some boards use this port for SPI Flash access though * U2UXD is unused and can be used for your projects. * */ Software Serial will not compile with this board. Instead use a hardware serial as follows: #include //required to use additional serial UART's #define RXD2 16 //Rx pin GPIO 16 #define TXD2 17 //Tx pin GPIO 17 void setup() { // Note the format for setting a serial port is as follows: Serial2.begin(baud-rate, protocol, RX pin, TX pin); Serial.begin(115200); //Serial1.begin(9600, SERIAL_8N1, RXD2, TXD2); Serial2.begin(9600, SERIAL_8N1, RXD2, TXD2); Serial.println("Serial Txd is on pin: "+String(TX)); Serial.println("Serial Rxd is on pin: "+String(RX)); } void loop() { //Choose Serial1 or Serial2 as required while (Serial2.available()) { Serial.print(char(Serial2.read())); } } /* Baud-rates available: 300, 600, 1200, 2400, 4800, 9600, 14400, 19200, 28800, 38400, 57600, or 115200, 256000, 512000, 962100 * * Protocols available: * SERIAL_5N1 5-bit No parity 1 stop bit * SERIAL_6N1 6-bit No parity 1 stop bit * SERIAL_7N1 7-bit No parity 1 stop bit * SERIAL_8N1 (the default) 8-bit No parity 1 stop bit * SERIAL_5N2 5-bit No parity 2 stop bits * SERIAL_6N2 6-bit No parity 2 stop bits * SERIAL_7N2 7-bit No parity 2 stop bits * SERIAL_8N2 8-bit No parity 2 stop bits * SERIAL_5E1 5-bit Even parity 1 stop bit * SERIAL_6E1 6-bit Even parity 1 stop bit * SERIAL_7E1 7-bit Even parity 1 stop bit * SERIAL_8E1 8-bit Even parity 1 stop bit * SERIAL_5E2 5-bit Even parity 2 stop bit * SERIAL_6E2 6-bit Even parity 2 stop bit * SERIAL_7E2 7-bit Even parity 2 stop bit * SERIAL_8E2 8-bit Even parity 2 stop bit * SERIAL_5O1 5-bit Odd parity 1 stop bit * SERIAL_6O1 6-bit Odd parity 1 stop bit * SERIAL_7O1 7-bit Odd parity 1 stop bit * SERIAL_8O1 8-bit Odd parity 1 stop bit * SERIAL_5O2 5-bit Odd parity 2 stop bit * SERIAL_6O2 6-bit Odd parity 2 stop bit * SERIAL_7O2 7-bit Odd parity 2 stop bit * SERIAL_8O2 8-bit Odd parity 2 stop bit */
| ASIN | B077KJNVFP |
| Best Sellers Rank | #1,075 in Single Board Computers (Computers & Accessories) |
| Brand | HiLetgo |
| Built-In Media | 1 x 16pin, 1 x 20pin, 1 x ESP32 Board |
| CPU Model | core_m |
| Compatible Devices | Computers (PCs, laptops), smartphones |
| Connectivity Technology | Wi-Fi |
| Customer Reviews | 4.0 4.0 out of 5 stars (141) |
| Item Dimensions L x W x H | 2.24"L x 0.98"W x 0.55"H |
| Manufacturer | HiLetgo |
| Memory Storage Capacity | 4 MB |
| Mfr Part Number | 3-01-1483 |
| Model Name | ESP-WROOM-32 |
| Model Number | 3-01-1483 |
| Operating System | FreeRTOS |
| Processor Brand | Espressif |
| Processor Count | 2 |
| Processor Speed | 0.24 GHz |
| RAM Memory Installed | 4 MB |
| RAM Memory Technology | LPDDR4 |
| Total Usb Ports | 2 |
| Wireless Compability | Bluetooth |
M**E
How to have reliable downloads
Wonderful board for hobby projects.. I have purchased 6 of them and never had any issues. Easy to use with either the Arduion IDE or PlatformIO. A number of people have reported that downloading is hit or miss. If you put a small capacitor between GND and EN, downloads will work everytime.
B**B
Getting sketches to upload and using additional serial ports
This board is different from many Arduino boards you may have used. It took me a week or two searching the internet to learn how to get it to work. First, the battery connector is reversed polarity compared to most LIPO batteries, so you may need to swap pins on the battery connector (Red wire to + on board). To upload sketches from the Arduino IDE, you must ground GPIO 0, then press the reset button. You may need to unplug are plug in the USB cable to get this to work. The serial monitor will display "waiting for download". Then you can upload a sketch, and when finished, unground the GPIO 0 pin and press the reset button again to run the sketch. /* * There are three serial ports on the ESP known as U0UXD, U1UXD and U2UXD. * * U0UXD is used to communicate with the ESP32 for programming and during reset/boot. * U1UXD is unused and can be used for your projects. Some boards use this port for SPI Flash access though * U2UXD is unused and can be used for your projects. * */ Software Serial will not compile with this board. Instead use a hardware serial as follows: #include <HardwareSerial.h> //required to use additional serial UART's #define RXD2 16 //Rx pin GPIO 16 #define TXD2 17 //Tx pin GPIO 17 void setup() { // Note the format for setting a serial port is as follows: Serial2.begin(baud-rate, protocol, RX pin, TX pin); Serial.begin(115200); //Serial1.begin(9600, SERIAL_8N1, RXD2, TXD2); Serial2.begin(9600, SERIAL_8N1, RXD2, TXD2); Serial.println("Serial Txd is on pin: "+String(TX)); Serial.println("Serial Rxd is on pin: "+String(RX)); } void loop() { //Choose Serial1 or Serial2 as required while (Serial2.available()) { Serial.print(char(Serial2.read())); } } /* Baud-rates available: 300, 600, 1200, 2400, 4800, 9600, 14400, 19200, 28800, 38400, 57600, or 115200, 256000, 512000, 962100 * * Protocols available: * SERIAL_5N1 5-bit No parity 1 stop bit * SERIAL_6N1 6-bit No parity 1 stop bit * SERIAL_7N1 7-bit No parity 1 stop bit * SERIAL_8N1 (the default) 8-bit No parity 1 stop bit * SERIAL_5N2 5-bit No parity 2 stop bits * SERIAL_6N2 6-bit No parity 2 stop bits * SERIAL_7N2 7-bit No parity 2 stop bits * SERIAL_8N2 8-bit No parity 2 stop bits * SERIAL_5E1 5-bit Even parity 1 stop bit * SERIAL_6E1 6-bit Even parity 1 stop bit * SERIAL_7E1 7-bit Even parity 1 stop bit * SERIAL_8E1 8-bit Even parity 1 stop bit * SERIAL_5E2 5-bit Even parity 2 stop bit * SERIAL_6E2 6-bit Even parity 2 stop bit * SERIAL_7E2 7-bit Even parity 2 stop bit * SERIAL_8E2 8-bit Even parity 2 stop bit * SERIAL_5O1 5-bit Odd parity 1 stop bit * SERIAL_6O1 6-bit Odd parity 1 stop bit * SERIAL_7O1 7-bit Odd parity 1 stop bit * SERIAL_8O1 8-bit Odd parity 1 stop bit * SERIAL_5O2 5-bit Odd parity 2 stop bit * SERIAL_6O2 6-bit Odd parity 2 stop bit * SERIAL_7O2 7-bit Odd parity 2 stop bit * SERIAL_8O2 8-bit Odd parity 2 stop bit */
K**A
Quit working
This esp32 board worked fine at first and was the easiest to program. Then I tried with a battery connected only. When the battery ran low it stopped. I reconnected it to power, the program did not start up and now I can’t reprogram it. It seems dead. I can’t talked to it with any app such as arguing.
P**R
IMPORTANT WIRES MAY BE BACKWARDS!!!
Works great so far! Make sure your wires are the right way in your batteries connector though. If the red wire doesn't look like it is going to end up by the little + sign on the board and the black wire doesn't look like it is going to end up by the little - sign on the board you may have to swap the wires in the battery connector like I did. This can be done with some patience and a needle, exacto knife, razer blade, etc. If you don't get this right, you will probably fry your board.
D**D
Note battery polarity; pull GPIO 0 low to program
Seems to work as-advertised, with the exception about being careful about reversed battery polarity that others have mentioned. Also note that you GPIO 0 needs to be tied to ground to put it in program mode - add a button or jumper to tie GPIO 0 to GND to upload new code then release/unjumper and hit the RESET button to run your new code. It'd be a lot nicer if they made that dance easier but it's not too bad once you get it down.
J**H
Works great
Flashing code works, depends on the board you get. You need to press the button during the boot loader programming period for the code to flash.
Y**8
Power circuit bad
Unable to power board or get to turn on with the power connector. Note the board has it backwards. JST PH 2.0 pins are a standard. Board has + & - backwards I saw this before connecting so no issue. Just switched my wires to the source so board doesn't fry. But still nothing! Not accepting 5v or 3.3v. Bad charging circuit. Which is a shame because these LOLIN32 boards are so easy to work with and easily take code ok. Did I get a bunk board? Or is
B**H
Works with battery - check polarity before attaching!
I bought a 3.7V 3000mAh 105151 Lipo Battery Rechargeable from Amazon to use for a Bluetooth project with a DHT22 temperature/humidity sensor. I did need to swap the battery leads but after that everything works fine. My project has no display and I am getting ~21 hours of operation before the battery drains down to 3.37V. I am now exploring esp_light_sleep_start() to see if I can improve the battery life.
O**O
La placa del esp32 es muy completa, pues integra un sistema de carga para baterías de litio ion. Muy bien!!! Su refigrafia, nombre de los pines, creo que es justa, soldados ya casi no se ve Pero el hecho de tener 4 estrellas es debido a que le falta una cosa para ser una compra redonda. Que menos que un cablecito de 5 o 10cm con el conector correspondiente para la batería ? Ahora tengo que comprarlo a parte (creo que es el 2.0mm JST PH 2-pin) Sería un detalle que se incluyera. Por lo demás, es breadboard frindely. Ver la foto. Permite tener una fila de pins libre.
C**N
Fa il suo
V**R
Das funktionierende Board tut seinen Dienst ohne Probleme. Programmierung und Betrieb haben ohne Probleme funktioniert und ich bin mit dem Board zufrieden. Das zweite Board funktionierte nur eingeschränkt. Die LED von der Akkustatusanzeige blinkte wie wild (laut im Internet gefundener Dokumentation ist das wohl bei dem SteuerIC für den Akkubetrieb eine Signalisierung einer Fehlfunktion. Programmierung ging auch nach ein paar Versuchen allerdings tat sich dann der WLAN etwas schwer. Musste daher leider das Board als defekt zurückgeben (Amazon hat bei so etwas mal die Ersatzlierferung einer fehlerfreien Ware weggelassen). Hoffe mal das es jetzt mit der Erstattung klappt. Bin daher etwas entäuscht, da nur eines von zwei Boards funktionierte. Daher auch nur 3 Sterne, hätten beide Boards funktioniert wären es von mir 5 Sterne gewesen.
R**I
En deepsleep elle consomme 180 μA, à comparer la node mcu est à 10 mA, l'esp32 cam aussi. Sur l'esp32 cam si on fait sauter l'AMS 1117 on obtient 298 μA. Donc c'est une bonne carte qui peut fonctionner sur batterie.
M**R
J'ai ressoudé une résistance mal montée sur la carte pour pouvoir la programmer. A part ça c'est une carte pratique (chargeur de LiPo intégré) et simple à utiliser (ESP32). Le convertisseur USB/UART fonctionne bien.
Trustpilot
2 weeks ago
1 month ago