


Buy anything from 5,000+ international stores. One checkout price. No surprise fees. Join 2M+ shoppers on Desertcart.
Desertcart purchases this item on your behalf and handles shipping, customs, and support to Thailand.
โ๏ธ Recharge like a pro, stay cool like a boss!
The Lichamp A/C R134A Recharge Kit is a professional-grade automotive refrigerant toolset featuring a 250 psi rated gauge, dual piercing and self-sealing can taps, and a heavy-duty hose with 3000 psi burst pressure. Designed for R-12, R-22, and R-134a systems, it offers versatile hose fittings and a complete package for efficient, leak-free A/C maintenance. Trusted by thousands, it delivers reliable performance and ease of use for both vehicle and refrigerator Freon recharging.


| ASIN | B08B43ZBTW |
| Best Sellers Rank | #18,354 in Automotive ( See Top 100 in Automotive ) #87 in Air Conditioning Line Repair Tools |
| Brand | Lichamp |
| Brand Name | Lichamp |
| Customer Reviews | 4.4 out of 5 stars 1,504 Reviews |
| Item Dimensions | 5.28 x 7.09 x 1.97 inches |
| Item Weight | 1.5 Pounds |
| Item dimensions L x W x H | 5.28 x 7.09 x 1.97 inches |
| Manufacturer | Lichamp |
| Material | Brass |
| Material Type | Brass |
| Model | AGS-R13452 |
| Part Number | AGS-R13452 |
| Thread Style | Sae |
| Thread Type | Sae |
| UPC | 791533865418 |
| Unit Count | 1.0 Count |
S**.
Good quality gauge and valve kit
At basically $30 I was skeptical about the quality of this kit with a gauge included. I bought it so I could add Freon to my refrigerator. This kit worked great with no issues. All the valves were top notch, threads were good and easy to use. It even had two piercing valves which I only needed one. Adding Freon fixed my issue and I loved how easy this kit made the job. Everything that was needed was included but the Freon. Next I am going to use it on my truck and top off that AC system! I can't vouch for how accurate the gauge was to a calibration standard but the values it had on the dial fell right into the area a refrigerator should be so again it worked for me.
M**G
2003 Ford Ranger - Happiness is a sweaty accumulator
Last charged it up two years ago and it was finally blowing hot again - and my old recharge gun no longer worked. Ordered this system yesterday. Instructions were included but lacking in a couple of details - like which side goes to the can and which side goes to the low-pressure port on the vehicle. I went back and forth a couple times but finally it seemed to work best when - with the gauge facing you topside up, the can connects to the right and the port on the left. Next problem was the self-sealing cans like to stay sealed - even when supposedly open. I found it necessary to back off the valve a couple turns, and it would actually only allow coolant to flow in a range of about half of one turn in the right spot. To confirm flow, I would slightly loosen the threaded connector attached to the low-pressure-port quick-connector. I'd turn the valve all the way in, and then slowly back it out until coolant flowed out the other end - and then I would quickly tighten the low-pressure-port connector. Kind of a PITA to do by yourself but that proved a reliable technique for every can. My last problem was the system was so low the compressor clutch wouldn't engage. Took me about 45 minutes of holding the can up high, shaking it and slowly gravity feeding coolant into the accumulator until enough leaked in to make it past the low pressure switch and activate the compressor clutch. Of course it would run one second, pressure would crater, it would disengage, and I'd go back to drip feeding. Over time, the compressor would engage more frequently and run longer, until I finally tickled the blue zone and it started sucking in refrigerant in earnest. Soon the accumulator started sweating and we were getting ice cold air in the cab. Time will tell how long this lasts. That system was EMPTY. Probably have multiple shrunken/cracked seals. Fortunately it appears the evaporator is right on the firewall at the top of the engine bay and easy to reach. Grateful for that. Long story short - kit worked just find and I would recommend to others. Thank you for coming to my TED talk.
S**E
Generally a good deal for the price.
Deducting a star for lack of instructions or documentation. I bought this kit to recharge a refrigerator, although I'll probably end up using it next time my car A/C needs a recharge. It took a little time once opening the package to figure out what each of the components was for. There's a coupler that it turns out isn't needed for my application, but will no doubt be useful for an automotive application. Some reviews mention shoddy manufacturing on the threaded fittings. Mine has no such problem, but I would still recommend using the included Teflon tape to help seal those connections. I made a mistake when attaching the piercing valve to a 1/4" pipe - a mistake that instructions would have helped avoid. I used the 1/4" sleeve and it seemed to work while I was charging the system. However, after I finished and let the fridge run for a few hours I observed that the inside temperature was not coming down. I went to add more coolant and saw that the piercing valve was no longer securely attached. I finally figured out that when using the smaller, 1/4" sleeve you must actually use both sleeves, with the smaller one nested inside the larger one. I fixed that problem and added more coolant. The piercing valve now remains securely attached and the fridge is cooling as expected. This may have been obvious in the first place, but not to me, sadly. Instructions would certainly have helped. Overall, though, I'd call this a win. Worth the spend.
H**1
Worked well for a whirlpool fridge wrx988sibm03
My whirlpool refrigerator wrx988sibm03 started having trouble cooling. First the ice in the door started melting and it wouldnt make any more ice. Then I noticed the freezer just wasn't getting cold enough and the fridge area was holding at low 40s. I moved any good food to the chest freezer and then checked the freezer evaporator. It had a fist size ice chunk right on the lines coming straight from the compressor, and the rest of the evaporator had nothing on it, which is a sign of low Freon. I also noticed an ugly solder joint that had the oily film, probably the culprit. I plan on using some silicone tape and a pipe clamp if I continue to lose freon. I hooked up this new valve and got some automotive R134A from walmart with leak stop. It wasn't very hard, just take your time and check out youtube, there are plenty of videos on how to do it. It took maybe an hour and saved me 3000 on a new fridge. Also one tip: The red handled valve you use to put on your self sealing can- If you twist the handle too far out IT WILL LEAK THERE during filling! So when you hook up your can, slowly turn the handle until you hear freon hiss out of the other end. This will get as much air out of the hose and be your stop point while you're filling your system. Then you can connect the other end to the bullet valve. (Then you retract the piercing screw to fill the system) I didn't have any trouble with the bullet valve's piercing screw leaking when the needle was fully retracted during the filling step, but its always good to just turn it maybe a half turn to open the valve. You need to it open just a tiny bit. Also make sure you clean the copper tube really well. Use some ultra fine sandpaper (400 grit, I only had 220 so I had to be super careful not to ruin the pipe) and gently sand it. Use some alcohol and a sponge to clean the debris off so its nice and shiny. The fridge is making ice again and has been working great. Hopefully I can get a few more years out of it. Hopefully this review helps someone!
A**R
As advertised
Worked great!
A**R
If you refrigerator isn't freezing and is low on charge, this may be overkill
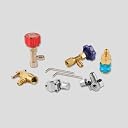
Our 15 yr old fridge's freezer wouldn't go below 30deg after a nine hour power outage. In the end, all I needed was a piercing valve, a hose and a valve to connect the hose to the R134 can. There was no instructions in this kit and after watching every Youtube video I could find, I felt getting the pressure to somewhere around 2lbs would do the trick. I ended up pushing in about 15 ounces before I would get that pressure (using the R134 scale on the gauge) WRONG! It over-pressured the system and the suction line was totally frozen. I ended up renting a vacuum pump (AutoZone) and starting over by putting in 5.75 oz, that was stated inside the fridge. (It took me a while to discover that. DOH!) You don't have to do what I went through. All you need is the piercing valve, a hose to connect to that valve and a valve to connect that hose to the R134 cannister. (this kit has all that... just more parts you don't need). Once you have those parts connected (including clamping the piercing valve properly on the compressor line, I used the suction line), pierce the line, open the cannister valve and bleed out some refrigerant at the piercing valve end ( let it bleed at least three seconds!), tighten the hose and then open the piercing valve to let in one ounce.(put the cannister on a oz scale...dummy) Close the piercing valve. Close the cannister valve. Let the fridge run for an hour or so. Chances are it will help. Get a good thermometer and monitor the temp. 0-5 degrees is about right. If it helps but not enough, add another ounce using the above instructions. (Make sure to bleed some R134 at the piercing valve as to not let any air into the system!) If your fridge is just low on refrigerant and nothing else is wrong, this procedure should help. Though in the end I screwed up and had to pull a vacuum for 40 minutes, our fridge is up and running like new. There is one caveat using this method. Some say the piercing valve can leak. That may be true. But it most likely will be very slow and who cares... If you have to do this every few years, no big deal. Better than buying a new fridge.
S**Y
Works great, no INSTRUCTIONS !
The kit comes with three valves. Only one valve is used depending on type of freon can. The red handle valve is used on self-sealing cans where a little nylon nipple can be seen for the valve stem to push down on to let freon flow. The chrome handle valve has a needle, not plunger, and is used on sealed cans that require being punctured. Not sure about the blue handle valve. The kit also comes with a snap-on adapter to fit a R12 to R134A adapter or possibly the automotive A/C low side port. I used the kit as follows for my chest freezer. Screw the red handle valve on the top of the can of freon with UV detector. One end of the hose [either end, don't matter] screws onto the can valve. After installing the Bullet Piercing Valve, the other end of the hose screws on to that. Don't let the extra valves and snap-on adapter cause confusion. It's a good kit, it worked well for me.
T**R
It worked!
My ~2004 Whirlpool side-by-side fridge wasn't keeping things frozen any more, and the ice maker had stopped working. Service call was quoted at $120 just to show up, plus at least $100 if they recharge it, and more if there's another problem. Using this took me a couple of hours total, including reading and watching some tutorials, but totally worthwhile. It does seem to be somewhat risky, as you could make your unit non-functional or even destroy the compressor if you screw it up too badly. But with some care and understanding, it's definitely do-able by any reasonably handy person. I got a small can of R-134a from a local auto parts shop, and I ended up adding about half the can in very small batches over two days to ensure that I wasn't over-charging. I would add some, and it would have to run for a while to bring the low-side pressure back down around zero. About a month on, the fridge and freezer are working perfectly.
G**Y
freon gauge
wording on dial face hard to read
J**J
OK quality
One valve came broken, the rest ok
Trustpilot
4 days ago
2 days ago