We remain fully operational. Our teams are working around the clock to ensure your deliveries continue safely.

DOWNLOAD THE APP


Copyright © 2025 Desertcart Holdings Limited
DOWNLOAD THE APP


Buy anything from 5,000+ international stores. One checkout price. No surprise fees. Join 2M+ shoppers on Desertcart.
Desertcart purchases this item on your behalf and handles shipping, customs, and support to Thailand.
✨ Don’t let dull headlights dim your drive — restore brilliance with SYLVANIA! 🛡️
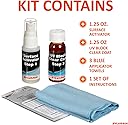
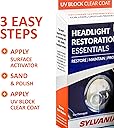
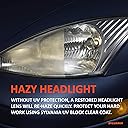
The SYLVANIA Headlight Restoration Essentials Kit features a UV Block Clear Coat that protects restored headlights from sun damage, preventing yellowing and hazing. It includes a Surface Activator to remove oxidation and grime, plus a lint-free applicator cloth for even application. Designed for easy use and long-lasting results, this kit helps you save on costly replacements while enhancing safety and style, all backed by SYLVANIA’s century-long automotive lighting expertise.
| ASIN | B01KIVYE6G |
| Best Sellers Rank | #1,094 in Automotive ( See Top 100 in Automotive ) #3 in Automotive Headlight Restoration Kits |
| Brand | SYLVANIA |
| Customer Reviews | 4.5 4.5 out of 5 stars (26,342) |
| Date First Available | August 16, 2016 |
| Is Discontinued By Manufacturer | No |
| Item Weight | 3.52 ounces |
| Item model number | HRKUVB |
| Manufacturer | SYLVANIA |
| Manufacturer Part Number | HRKUVB |
| Model | SYLVANIA UVB CLEAR COAT Headlight Restoration Kit |
| Position | Front, Rear |
| Product Dimensions | 6.5 x 2.94 x 1.25 inches |
| Voltage | 12 Volts |
A**R
Go easy on the spray because you need it twice. Great product!
This kit worked great! The only thing I would recommend is that you use the spray conservatively because it has to be used twice. Don’t go bonkers with it on the first application. Easy to use, the instructions are easily understood, and my headlights look great. Make sure you have access to plenty of water because you need it for the sanding. Read ALL instructions first and you’ll be fine. Great product!
R**L
Way better than replacing lights! It works!!
A+. Wish I had taken a before and after pic to show the change. I drive a 2011 Toyota sedan and the lights were admittedly fogged over. I didn’t realize how bad until a trip to NV last fall and one headlight went out. I decided that was my nudge to purchase new lights. Had them priced out for $250 each. A friend suggested this product before purchasing. What an awesome friend. It’s been 3 months and the lights are crystal clear. Awesome product but the application did get a little tiresome as it’s not exactly an exciting job. Totally worth it though considering the outcome and cost!! And my photo was taken after a cruddy few days in the Pacific NW 3 mos later. Not a clean car as you can see but the lights are great!!
C**.
Headlights you thought you'd have to replace? Nope! This makes them like new. Really!
I own a seventeen-year-old Toyota Yaris hatchback (152,000+ miles), which has been parked outside in the sun and elements all of its life. I'd already had the headlights resurfaced (by the Toyota team) many years ago—but my headlights were, by this point in time, at the stage of not passing annual inspection. Replacing both headlight units at the dealership (including labor) would have cost in excess of $700, so I figured—why not try this, and see what happens! The results are really terrific. As "like new" as you're going to get with a seventeen-year-old car which is parked outside. Here would be my observations having just done this project this morning (without access to a hose, mind you!). The instructions are worth reading a couple of times before you take-on the project. It's, actually, a lot easier than the very detailed instructions might imply. Just go step by step, doing each step to both headlights before you move on to the next step, and you'll be fine. 1) Bring lots of water, and a spray bottle (as recommended in the instructions). I filled up some clean milk-cartons I'd saved for the project, and just refilled the spray bottle from those as needed. Super easy. I used about three milk-cartons of water (1.5 gallons). You'll need lots of water-spray as you sand with the provided grades of sandpaper. I would recommend starting (with the first grade of sandpaper) with light to medium pressure, then move to more consistent medium pressure. The second and third grades of sandpaper really are very smooth and fine, and you can finish-off the third grade of sandpaper with a really light pressure. Be patient, and go for a truly smooth surface. I did the recommended circular motions both clockwise, and counter-clockwise, to ensure the smoothest possible finish. Worked like a charm. 2) Regarding the activator spray (with which you will start and, toward the end, use again): I used about 2/3rds of the spray on the first stage (both headlights), dissolving the initial oxidation and grime. I feared I'd not have enough with just 1/3rd by the end, but I had plenty. I'd bring a soft sponge, too, just to ensure that you get the lenses fully clean between steps. I found having extra soft, clean rags helpful with drying as well. 3) Painter's tape definitely protects your paint around the headlight, so take the time to mask-out your light, and protect your paint. The only thing I'd suggest, is to spray-clean your paint-surface after your remove the painter's tape following use of the polishing compound. Some of the polishing compound gets under the tape, so just give that a rinse before you dry the lenses and apply the final UV gloss-coating. Keeps things neat and clean around the lenses. 4) As for the gloss-coating: you really can be very generous applying it to the provided blue-cloth. I was a tiny bit stingy on the first headlight, fearing I might not have enough product for the second headlight. Don't worry ... you'll have plenty of UV product left over when you're done. I'd really soak the entire blue-rag well, and apply generously. I can see a *very* tiny difference between the first headlight I did (where I was more stingy applying the UV gloss-coating) and the second (where I was more generous). It's so slight you'd never see it. Just rest assured that you'll have plenty of UV gloss by the end of the project, as it spreads evenly, smoothly, and well—so be generous in applying it. The best part? If I get any haze again, this was probably the easiest headlight-repair imaginable. I'll just do it again! And I saved about $700 to boot. You just need to set aside the time to do each step well and carefully. It took me perhaps an hour and a half from start to finish (and I was moving slowly and carefully), with some time thereafter cleaning up and just standing around to ensure no falling autumn leaves fell on the UV gloss while it was still wet. Just went to check on the headlights, and they're completely dry to the touch, and very smooth and glossy. This is a terrific product! Easy to use, great instructions, and a really fine result. I look forward to seeing the longevity of the product.
G**Y
Complex Process With Generally Good Results And A Few Issues
In general, this product provided good results, but there were a few issues with using the kit that I wish I had been aware of before using it to produce better results. The instructions provided with the kit are clear and detailed, which is important because there are multiple steps involved in using the kit and all have to be done in the correct order and with the necessary thoroughness to produce good results. I was able to apply tape to the paint surrounding the headlights and go through all of the necessary steps to finish the process in about two hours. All of the materials needed to complete the process are included in the kit, except for two basic tools I needed to use the kit on my car that is parked outside my apartment complex in a parking lot, with no access to a garage or a water supply. I needed to add to the kit materials several 32-ounce water spray bottles and a roll of paper towels. With those two items, and the items provided with the kit, I was well-equipped to complete the steps described in the instructions. The main issue I had with using the kit and producing the desired results arose from applying the UV protection treatment that is the last step in the process. The instructions state that the user must apply the UV protection treatment liquid on an included paper cloth in even, continuous strokes across the headlight cover, overlapping the previous stroke slightly. This did not work in practice to produce a clear headlight cover on one of the two headlights on my car. In reality, overlapping the previous stroke of applying the UV protection liquid acted to disrupt the liquid already applied on one of the two headlights and created some mild haze in the final appearance of some portions of the headlight cover. Once that haze appears there is no way to correct the problem - as going over the problem areas again will only make the issue worse (per the instructions, which warn the user not to touch the headlight covers after applying the UV protection liquid). The other issue I had with the product is the complexity and time involved in using it. There are other kits that have fewer steps and take less time. For example, one of the liquids supplied in this kit has to be applied and then washed off four times during the completion of all of the steps in this process for both headlights. However, this kit has a good reputation for producing quality results that last longer than some other similar products. So, I am still pleased that I used this product for my first experience in headlight restoration, as it did a good job eliminating the heavy, opaque discoloration caused by long-term exposure to the sun and the headlights look much better than they did before using the product. One headlight looks new, and the other looks clear except for a light haze where the UV protection liquid seems to have dried slightly cloudy in some areas. I am guessing that the light output from the headlight with the slight haze in some areas will not be affected significantly from the haze. So, with the warning that this kit takes time and effort to use correctly, and with the additional warning that you should try not to overlap your application strokes of the UV protection liquid (contrary to the instructions) and try not to re-touch the surface after applying each stroke of that liquid, I can recommend the kit.* *One other issue I have with the product is the alleged warranty. I tried to register the product on the Sylvania website, so I could enroll in the warranty. However, the website requires that I provide my telephone number to register the product. I am not willing to provide my telephone number, due to the unknown risks that it will be sold to others or stolen and used by criminals, so enrolling in the warranty is not possible for me.
S**E
Easy-To-Use & Better Results Than I Hoped For On My Wife's Lexus
I am very pleased with the results of using this product. I would purchase this kit again in a heartbeat, as the headlights on my wife's Lexus now look virtually new. Gone is all the yellowing, hazing and surface roughness that was there before. Amazing improvement. We always park our cars in the garage, so I imagine my refurbishment will last longer than some people's. As such, this was an awesome twenty bucks to spend. Perhaps I was more thorough than required, but it took me about 80 minutes to do both headlights, not 30 minutes like the package says. 30 minutes per light would be a decent estimate, perhaps. My job took a bit longer than expected 'cause I purchased some 2500-grit wet sandpaper so as to make the final sanding coat even finer than the 2000 grit included in the kit. While I was doing the work, I wondered if I should also do a pass with 4000-grit sandpaper. Not exactly, but I would add a pass with 4000-grit, yes. If I was to do the job again, I might start with something less coarse than the 400-grit that's included in the kit, as I think it scratches the lenses a bit too much; some sand marks are still visible (**barely** and only with **very** close scrutiny) after completion of the job. I did NOT skimp on the sanding steps at all, so this is not a case of my not being thorough enough. Having done some of my own bodywork and painting, I know all too well that skimping on sanding = high cortisol later on in the job. The kit worked out well, but I wish that Sylvania included twice as much of the surface activator. Tip: Start spraying at the TOP of your headlight and let gravity coat further down for you, thus saving on activator. You use activator TWICE on each headlight, not once, so conserve if you can. Another tip: I recommend filling a gardener's sprinkling can with water, not using the hose, particularly if you work on one headlight at a time like I did. If you do work on one at a time, pay close attention to the wind and be sure not to splash water on your just-completed first headlight. I used blue painter's tape and did an extremely careful tape job, just as if I were going to paint the headlight. Tip: be extra careful and precise with your tape job. As you start sanding, you'll thank yourself for the careful tape job. The blue tape doesn't stick as aggressively as the electrical tape included in the kit, and the blue tape wanted to let go of the car as the job progressed. This wasn't a deal-breaker for me, but you might achieve better long-term adhesion with the included tape. No matter which tape you use, protect more of the car than you think you need to. The clarifying compound seems similar to me to the 3M rubbing compound I've been using on our cars for years. I didn't run out of clarifying compound like I thought I might. If I had, I'd have used 3M rubbing compound, too. Be careful when applying the UV clearcoat and do your best to keep it off the car. By then, you will have been instructed to remove the tape from around the headlight, thus it'll be easy to "color outside the lines" if you're not careful. I thank Sylvania for marketing such a helpful, easy-to-use product. I am proud of the work I did with this kit...and proud that I was smart enough not to pay $175-$300 for headlight restoration, which are the prices I was quoted by a top detail shop and the dealership.
N**E
Clear as glass again—Pro results in an hour (Winter tested)
My headlights were completely clouded over and oxidized, significantly reducing my visibility at night. I decided to try this kit before spending hundreds on new housings, and I’m glad I did. Complete Kit: This came with everything advertised. The instructions were very clear and easy to follow. User Pro-Tip: While the kit is comprehensive, I highly recommend using a separate spray bottle with water for the wet sanding steps. Keeping the surface constantly lubricated makes the sanding much more effective and prevents the paper from loading up. Effort vs. Reward: It took about one hour to do both headlights. It definitely requires some "elbow grease" during the wet sanding stages, but don't rush it—the more effort you put into the prep, the better the final result. The Results & Durability: The transformation was night and day. The lenses went from hazy and yellow to crystal clear. Most importantly, it’s been three months since the application, and they still look brand new. It has held up perfectly through harsh winter driving (salt and slush) and several trips through the automatic car wash. Final Verdict: 5 Stars. If you’re willing to put in the manual labor for an hour, this kit will save you a fortune. The sealant actually lasts, which is the biggest factor.
M**Y
Excellent. REALLY WORKS!
I researched different products and this brand, Sylvania Headlight Restoration Kit, had the best reviews. (I paid about $23.) My headlights were pretty bad... foggy and significantly yellow. It took me about an hour and a half to complete the job. I was a little worried that I might mess it up, so I was pretty cautious and deliberate and took my time. (There are videos on YouTube showing how to use the kit, including one put out by Sylvania, but I actually found a video by a layperson to be more detailed and helpful.) I followed the directions, beginning by pre-washing the headlights to remove any foreign matter. (I used Dawn dishwashing liquid and a sponge.) I put painters tape around the headlights for some protection. First you spray the headlight with a surface activator, washing it off after 30 seconds. You then sand the headlights for 5 minutes while using each grade of sandpaper, starting with the corsist. Next, you apply a clarifying compound, rubbing it in for about 30 seconds and then washing it off. Lastly, you spray the surface activator once again, leaving it for 30 seconds, and then washing it off. You repeat the same steps on the other headlight. Once you've completed both and have washed and thoroughly DRIED them, you're ready for the final step which is to apply the UV Block Clear Coat. (The directions say that you should try to apply as thick a coat as possible for maximum protection, but not to repeat or reapply on treated areas. I found that rather difficult. I wonder if using a sponge would have been more helpful with putting on a thicker coat, rather than the cloth they provided.) I still had almost half the bottle left over when I finished, so I'm not sure how long or how well they will hold up. I'll have to update my review from time to time.) After completing the restoration, the directions say that they need to cure for 4 to 6 hours. During this time, they can't be exposed to moisture. So you have to make sure it's a nice day, (but don't do it in direct, strong sunlight or frigid temperatures), or do it in a garage or other covered area. I took these pictures just before, and then just after, I treated them. They'll need to cure overnight. I don't know if that will will improve or change their appearance. For the shape my headlights were in, I'm amazed and extremely happy at how clear they look. I'll just have to wait and see how long the clarity lasts. (The thinner layer of UV block might cause it oxidize and degrade more quickly.) I definitely recommend this product. I'm extremely happy with the end result.
M**A
Not a long-term solution
Not sure if I'll buy again. It all depends what you need it for. With enough elbow grease and skill you can make the headlights look as new, no exaggeration here, very impressive results, as thousands of reviews here will attest. However the product only last for about a year or so. I first tried this in 2023 on my 2016 MDX, that only started to show isolated cloudy spots. Most of the headlight was still looking great. I was really happy after applying this product, headlights really do look amazing on day 1. However, after about a year I started to get cloudy spots again, and it went downhill really fast after that. After another 12 months the headlights looked horrible, completely cloudy, not a single clear spot, with yellow blotches all over. I fell like they would've faired much better if I would've let them alone. I can't really explain why, but I decided to spend another >20 bucks on a new kit and reapply. Not sure how others claim to do this in "15 minutes", in my case it took over 90 for both and it didn't feel like I was going too slow. This time the "Surface activator" actually looked like it did something, and was pretty effective at removing the old failed coating, and the sanding and polishing steps made the headlight look better, rather than worse. Impeccable results once again, after all was finished and done, but I don't want to go through this again a year from now. I do use masking tape, and I still managed to spill a drop of "UV bock" clear coat on car paint and only noticed it after it has cured. Two years later that ugly yellow spot was still there and not budging at all. Since this is more of a paint job rather than a "rub on" application all the effort put into prep work and proper conditions really do pay off. It's not easy to do it right, and it's a pity the result only lasts 12 month. There are plenty of other products that are more of a polish+wax type of product and possibly don't look quite as amazing fresh after application, and probably only last half as much, but really do only take 15 minutes to apply, without too much stress about rain or dust or getting this stuff on car paint. For simple day to day use I think I'd rather go with something like that.
Trustpilot
1 month ago
1 month ago