Buy anything from 5,000+ international stores. One checkout price. No surprise fees. Join 2M+ shoppers on Desertcart.
Desertcart purchases this item on your behalf and handles shipping, customs, and support to Thailand.
🪚 Sharpen Like a Pro, Every Time — Don’t Let Dull Tools Slow You Down!
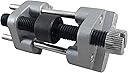
The ATLIN Honing Guide is a precision sharpening jig designed for chisels (1/8” to 1-7/8”) and planer blades (1-3/8” to 3-1/8”). Featuring adjustable angles with clear projection markings, a durable cast aluminum frame, and a hardened steel roller that resists wear, it guarantees consistent, razor-sharp edges. Perfect for professionals and hobbyists alike, it includes easy-to-follow instructions and fits a broad range of blade sizes, making it an essential tool for maintaining peak woodworking performance.
| ASIN | B07C9X3F98 |
| Best Sellers Rank | #40,968 in Tools & Home Improvement ( See Top 100 in Tools & Home Improvement ) #87 in Power Tool Accessory Jigs |
| Brand | ATLIN |
| Brand Name | ATLIN |
| Color | Black, Silver |
| Customer Reviews | 4.3 out of 5 stars 5,963 Reviews |
| Grit Type | Coarse/Medium/Fine |
| Item Dimensions L x W x H | 1.5"L x 1.3"W x 4.1"H |
| Manufacturer | ATLIN |
| Manufacturer Part Number | WO1002A |
| Material | Aluminum, other materials |
| Material Type | Aluminum, other materials |
| Model Number | WO1002A |
| Number of Items | 1 |
| Product Dimensions | 1.5"L x 1.3"W x 4.1"H |
| UPC | 867955000468 |
| Unit Count | 1.0 Count |
P**R
Great value and effective
Read the instructions carefully. It takes skill and practice to place the chisel or blade correctly. Once you`re dialed in, you will get a perfect sharp edge on your tools. Great value, thank you!
B**D
Atlin honing guide
A good, simple, affordable, eclipse style honing guide. I like that it will work with chisels down to 1/8”.
S**A
Simple and effective
This honing guide is very simple to use and the instructions are clear and well-worded. The guide will accept most chisels types and plane blades. I tested it with an old chisel and a medium oil stone. It is important to clamp the chisel in the guide using pliers or a large screwdriver; hand tight will not hold (the instructions also state this). I was able to achieve a perfect bevel on the first attempt. Would recommend and would buy again.
L**B
Awesome for the price!
Thanks to this guide and a set of cheap diamond stones (also from Amazon), plus some polishing compound and a scrap of denim from my sewing pile, I have finally experienced the pleasure of hand planing without breaking a sweat and watching transparent curly shavings emerge from my hand plane. The planed board is so smooth, it's ready to finish! I thought I could freehand sharpen, and yes, the edges I got from freehand sharpening were OK, but with this guide, my bevels are finally straight and even. The little instruction sheet is CRITICAL to read. It has clearly been refined over a long time by watching customers misunderstand or ignore their instructions and returning the guide or reviewing them poorly and unfairly. I had questions (why one rounded side? why does my tool keep slipping off?) and the instructions answered both (because rounded side = 1 point of contact = actually more stable, and you NEED to tighten the screw with a screwdriver, not by hand - I constantly forget this). I could tell from that little sheet of paper that Atlin is a business that knows sharpening, cares about both sharpening and its customers, and wants them to succeed. Not your average Chinese copycat mass producer of crap, although their stuff is made in China. Anyway, with the screw properly tightened, I was able to push and pull the blade and guide along my stones without the blade budging. And since the blade doesn't budge, I can apply pressure on both the push and the pull stroke, and grind away metal twice as fast. Game changer for a lazy impatient person like me. I get a consistent burr in seconds. I use a fine tip Sharpie and a try square to draw a line on the back of the blade, perpendicular to the side, where the guide should sit, so I don't have to measure every time. Come to think of it, I should draw that line on the side so it's not ground away during the flattening. I had no trouble with the guide wobbling, even with just one roller. Would I prefer a wider roller, or 2 rollers? Maybe. But all I have to do is use my index fingers to apply firm pressure on both sides of the back of the bevel, just above the stone, while my thumbs rest on the back of the guide. That keeps the guide flat on its roller. And I find that pressure points matter - the grinding isn't as good if I push anywhere other than the edge, so that's the best place to apply pressure anyway. Where I do have trouble is tightening the screw. It's hard to find a way to hold the blade in the guide at the right depth and turning the screwdriver while avoiding the roller, because if I touch the roller and it turns, it knocks the blade out of place. The best position seems to be to hold it in my left hand, let the roller hang in the gap between middle and ring finger, use my left thumb to hold the blade against the guide, and use my right hand to tighten. An actual complaint: this is on me for not reading the description, but it can't fit plane irons less than 1 3/8". And I learned the hard way that my block plane iron is 1". So, not taking stars off, but you should be aware of that.
P**K
Functional, but with problems and frustration
I purchased this honing guide as a less expensive alternative to others on the market. The design is simple, and similar to that of a well-known hand-tool company’s significantly more expensive offering. But…one gets what one pays for, I think they say? Let me first say that the instruction sheet, while helpful, is discouraging in a simple but telling way. On that sheet, one learns that there are basically two kinds of chisel: the paring chisel and the mortise chisel. Ummm…no. The current accepted classification system denotes three primary types of chisel: the paring and mortise chisels, as mentioned, and the bevel-edge chisel—which comprises by far the most common type of chisel most will encounter. While bevel-edge chisels can be used for mortising, their primary use is for cutting and clearing the last bits of things like dovetails, dados, and the like. Mortising chisels are a much beefier chisel than their bevel-edge brethren, and for good reason—chopping mortises is a high-impact, high-stress experience (from the perspective of the chisel, at any rate), whereas clearing out the waste from dovetail joinery is simply a kinder, gentler way of doing things. Paring chisels are their own thing, and rightly so. But back to the instructions and the device itself. The instructions indicate three different ways the device holds blades; the top-most portion of the jaws is intended to hold plane blades for sharpening; this works reasonably well, but with one important caveat, which will be repeated later: one side of the jaws is slightly convex, such that the side of the blade contacts the jaw on that side at only a single point. The company claims that this is all that’s necessary, and actually is better than alternatives, in that “it forces the chisel to be square against the [opposite] flat edge”. But it also reduces the security of the blade in the device. Meanwhile, if the tool was properly machined with opposing flat and parallel jaws, the blade would be held by each jaw along its entire length, creating a more secure, as well as square, hold. In this, their idea of better is simply a means of defeating “good”. The above issue also contributes to another drawback of the tool; in order to adequately secure a blade within the device, the company says that the jaws must be tightened with a screwdriver—hand-tightness alone is inadequate. What they’ve actually done is create a problem (difficulty in adequately securing a blade in the tool) and then try to solve it by force rather than design. This error is compounded by the fact that what they call “mortise chisels” are to be secured in the deepest part of the space between the jaws, with no bracing against a square edge on the superior surface to ensure that the blade remains square—again, this is supposed to be overcome by tightening with a screwdriver rather than just by fingers. At this point, my experience with the tool is perhaps best characterized by noting the distinct lack of warm and fuzzy feelings. This all said, this device can get the job done. And yes, there are websites out there that will show one how to modify one’s brand-new honing guide to make it perform better. But that sort of thing simply should not be necessary. This isn’t the worst honing guide on the market, but it’s also a far cry from what one can and should expect. So, a passing grade, but no more.
R**O
Read the Directions for Much Success
Okay, first off I was worried from some negative reviews, but went ahead with this anyway. After using it, I realized there is a big factor in success: reading the simple single sheet of instructions. It clearly says how a mortise chisel (the type with the straight sides - sheesh there is even a diagram example) is secured at a different place on the jig. My Marples and my Stanley chisels are all mortise chisels, and I imagine this is the most common type used (as the directions even say, it is probably a mortise chisel if you don't know). Following the simple instructions, I was able to secure 2 different types of Stanley plane irons and 4 different chisels (size 1/2 to 1"). I had previously sharpened my plane irons free hand on my diamond plates and thought I did okay. When I used the jig - wow did I notice what a horrible job I did freehand! I am surprised anyone would recommend doing this freehand. When you think about it, it is like saying you can do a better job using a table saw without a fence or sled. Here you are doing hundreds or thousands of cuts and want consistency to have a uniform angle and edge. The human body flexes - even if you have locked your wrists the best you can. Power to those superhumans that can achieve a fine edge doing this freehand, but for me and I imagine most people out there, it was much easier to put the blades in a jig. It is a very simple device. You lock in the blade in the appropriate slot, extending it to the length you want for the desired angle (suggestion: use a quality ruler with millimeters if you want to be precise. Make a quick cheap wooden jig for depth of future sharpening or other tools). For my chisels, I found the angle while I had it in the jig and then secured it rather than using the length to determine angle. After that it was just a matter of sharpening away. I didn't have to worry that it would be consistent - just held the pressure at the tip of the blade and made sure I wasn't lifting off the back wheel and went to it. From the brand new Marples chisel I was setting up to the antique Stanley #5 plane iron (circa 1941) this did a brilliant job on diamond plates and wetstones. I followed methodology from some woodworking channels and was able to achieve a mirror edge and cut paper with all blades. I did stropping freehand because I figured I could do little damage to the angle I had created with stones, so I can't say how it works for that but I imagine the same principal - maybe the wheel would sink in the leather a bit. As far as any naysayers about the build quality, I didn't notice any issues. Maybe there was some slight cast slag here and there but nothing that made me think low quality. For less than $20 it did the job and I imagine it will be solid for many sharpening sessions.
T**S
It works good but does require a little work
I have been needing a honing guide to touch up my chisels. Not wanting to spend a lot of money on one right now, I found and bought this one. I like that this one is small in size but still pretty stable while using. Setting up the right angle for your chisels takes a few minutes to get right. Holding the chisel in place, then having to tighten with a screwdriver leaves room for movement of the chisel and then you're starting over setting it up. A small knob to tighten would help with that. Once set, it's easy to use but also easy to get wrong. Keeping good even pressure gives a good result. I'm just using a basic honing stone at the moment but this can be used on other honing surfaces. One reason I got this one. After using, I can definitely tell a difference in the sharpness of the chisel so at the end, it's worth it to me. I do plan on getting a better version on down the road but for now, this one gives a good result and I'm happy with it.
A**O
Good quality honing guide at an affordable price
So far, performs similar to a good to high quality honing guide but at half the price. Make sure to follow the directions closely for securing chisels and plane irons correctly. I assume some of the negative reviews are based on not following the directions. To tighten the screw, for example, you should use a clamp or screwdriver rather than hand tighten. Also, roller mechanism can probably wear down pretty quickly if you’re using the guide incorrectly
C**P
Buena Calidad
Me gusto mucho la calidad de la herramienta. Buenos acabados.
Trustpilot
1 week ago
1 month ago