We remain fully operational. Our teams are working around the clock to ensure your deliveries continue safely.

DOWNLOAD THE APP


Copyright © 2025 Desertcart Holdings Limited
DOWNLOAD THE APP


Buy anything from 5,000+ international stores. One checkout price. No surprise fees. Join 2M+ shoppers on Desertcart.
Desertcart purchases this item on your behalf and handles shipping, customs, and support to Thailand.
🔌 Connect smarter, not harder—wire perfection in a snap!
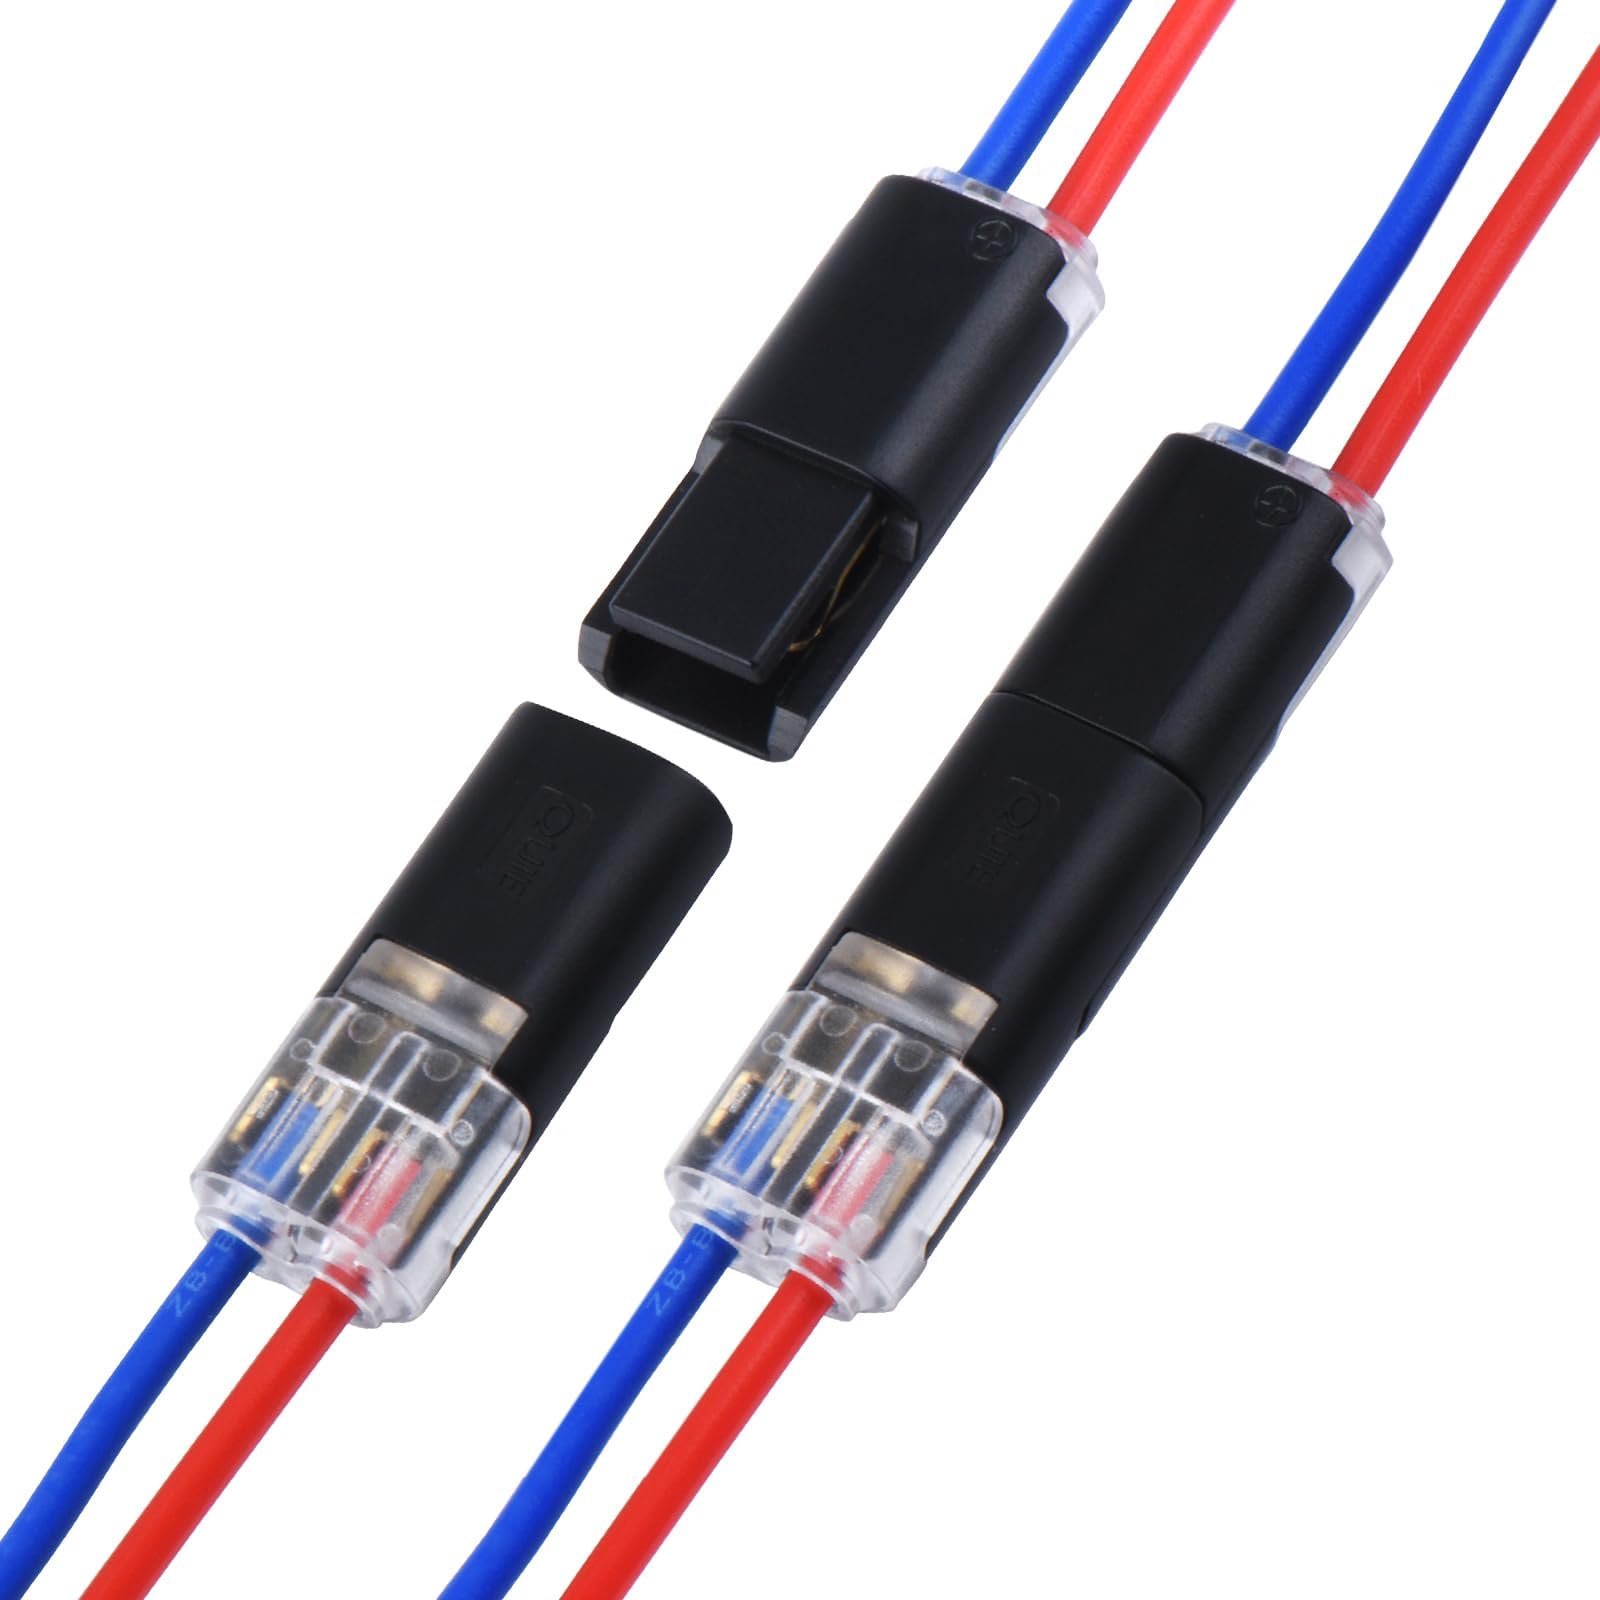
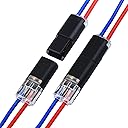
Brightfour Wire Connectors are a pack of 12 solderless, low voltage I Tap 1 Pin connectors designed for quick, secure mid-span branching on 20-24 AWG wires. Featuring a durable copper clasp, these connectors eliminate the need for stripping or soldering, reducing installation time by 50%. Compact and transparent, they’re ideal for automotive, LED lighting, and other electrical projects requiring reliable, space-saving wire connections.


| ASIN | B0F1MNVV98 |
| Best Sellers Rank | #39,978 in Tools & Home Improvement ( See Top 100 in Tools & Home Improvement ) #60 in Electrical Connectors |
| Brand Name | Brightfour |
| Color | Pluggable 2 Wires for 16-18 AWG |
| Connector Type | Quick Disconnect |
| Contact Material | Copper |
| Customer Reviews | 4.0 4.0 out of 5 stars (70) |
| Insulation Material Type | Polyethylene |
| Manufacturer | Brightfour |
| Material Type | Copper |
| Maximum Voltage | 12 Volts (DC) |
| Model | Bf-PWC2PinB |
| Terminal | Pin Terminal |
| Unit Count | 24.0 Count |
J**S
Great little connectors!
I saw these and decided to give them. try. I used them for the first time and they worked great! They are so much better than traditional crimp type connectors.
A**Z
Excelente producto, muy bueno lo recomiendo muy versátil.
P**T
Easy to use pluggable 3-wire splices for 20-22AWG solid or stranded wire
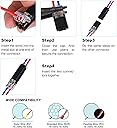
I have to work on some electronic equipment where a printed circuit board, which needs to be removed with some frequency, is difficult to remove because a number of 22AWG solid "hookup wires" are soldered to holes in the PCB. I wanted to cut those wires at some point a few inches away from the PCB and install pluggable "butt joint connectors" at each place where a wire was cut. In this way, the wiring to the PCB can be easily unplugged and later re-plugged. I found this product on Amazon and decided to give it a try. Be careful.....on the same Amazon listing, there are three OTHER types of connector, and THIS review is ONLY for the 3-wire model. I tested the connector using 22AWG solid wire with PVC insulation, and also with 22AWG high-strand-count test-lead wire with silicone insulation, and found that the connector(s) worked well with both types of wire. I noted from some other comments that some people have not been able to make these connectors work. They reported wires falling out, or not making good connection, etc. I had similar issues when I first experimented with these connectors. Through experimentation, I learned a way to make them work as intended: 1) Raise the clear plastic cover from the black body of the connector. It hinges up, using a thin section of itself as the place where the hinging/folding occurs. Because a pair of tiny plastic snaps are trying to hold the clear cover in the closed position, it can be difficult to get that cover to start moving up.....I used the edge of a straight-blade screwdriver, hooked under the edge of the clear cover, to get sufficient 'grip' and leverage. 2) Raise the clear cover WAY up (see photos). It won't want to raise up more than the proper position, but some people might think it does not need to be raised that far. If it is NOT raised far enough, the wires cannot insert far enough to allow a good connection to be made, and either the wires will fall out, or will be loose and not making good connection. 3) Do NOT strip the ends of the wires; simply slide each wires through the round holes in the clear cover, and then down into the connector until they will not go further (see photo). It is best to do this operation with the cover's holes aiming up and the wires going DOWN into the connector, so they won't fall out by gravity. 4) When up to three wires have been inserted fully (you do not need to use all three wire positions), carefully close the clear cover until it gives increasing resistance to movement; this will help keep the wires in place during the next step. The clear cover holds the wires in the correct position over the brass insulation-displacement clips inside the connector. 5) Use a pliers, such as a slip-jaw/"Crescent Wrench" type, to firmly squeeze the clear cover down over the wires and metal the insulation-displacement clips, until it snaps into place in the full-closed position. The grip area of the pliers should be about the same size as the face of the clear cover...don't use a needle nose type pliers. 6) Give each wire a firm "pull test"; if the insulation-displacement clips have properly engaged each wire, you should not be able to pull the wires out from the connector. Each connector is identical, and you need TWO of them to make a pair of connectors. There is no "male" and "female", they are all "bisexual". Just have one connector oriented face-up (clear cover up) and the other connector face-down (clear cover down), then press their open ends together firmly until they snap together. NOTE: when inserting the wires into the two connectors, remember to reverse their wire order on the second connector, so that when that connector is flipped 'face-down', its wires will line up properly with the wires in the first connector. The connectors can be unplugged by gripping them firmly and wiggling them apart.
H**D
JUNK
JUNK. step 1 says to insert the wires into the metal slots. step 2 is to close the cap with pliers. but FIRST you have to move the clear cover up. the photo with the dimensions show the cover up, but it is not easy to move it up. the "hinge" is just bending the weak plastic. when you go to insert the wires, you have to insert them through the plastic cover that is now at an angle and then into the flat metal clips. those clips are not mounted, just placed in position. you are already trying to weave the wires into the plastic cover at an angle, now you have to deal with the metal clips moving. clamping down on the plastic "seems" to secure 20 awg wire, but there is no feel of confidence. my tries with 22 awg wire were not successful clamping a secure connection.
M**J
Great Product
This product is a fantastic find! It's reasonably priced, making it accessible for most budgets without compromising on quality. The product is exactly as described, and its usefulness cannot be overstated. I've found it to be incredibly practical and efficient in meeting my needs. The attention to detail is impressive, and the performance is on par with more expensive alternatives. If you're looking for something reliable, well-made, and at a fair price point, this is the perfect choice. Highly recommended!
L**M
Amazing replacement for JST SM Connectors in Sole E35 Elliptical machine. Simple & Brilliant design
I replaced a couple of JST SM Connectors in a Sole E35 Elliptical machine. The original JST SM collectors were hot glued on top of being crimped. And the wires had snapped off. I didn't need a crimping tool for these new connectors. There is a small "+" mark on one of the terminals to align the wires correctly on either side. I aligned my green wires to this "+" terminals and the red wires to the middle terminals on either side. It made it so easy to ensure that all wires were properly connecting on either side of the two connectors. Amazing, Simple & Brilliant design. Good quality.
T**E
18ga just ok, 16 ga, no way
Finally made the connection of 2 18ga wires. Broke 3 of the connectors in process. Good think they come by the dozen. Hope the 8 remaining are enough for me to make one more 2-wire 18ga connection. These are listed at 16-18ga compatible. Given my struggles with 18ga, there is no way you're getting these to work with 16ga wire. Would not buy again.
J**I
For quick connect use
Perfect for thinner wires. Easy connect and disconnect. Press and pinch installation. Feels well made.
D**E
I accidentally severed the internal low voltage power cable on a new exercise bike when unpacking it. Wire ends were hard to access and were thin (22awg x 3 inside casing) so I wanted easy solution without having to strip wires, use solder, etc. The Brightfour connectors worked great. Since there were extras in the package I was able to use some old 22awg wires to practice on before the real thing. A couple of tips. Used a knife to pop open teach connector. Make sure the 3 tabs in the back of each connector are facing down before joining to make the final connection. Great product, much cheaper than buying new power cable.
Trustpilot
1 week ago
1 week ago