Buy anything from 5,000+ international stores. One checkout price. No surprise fees. Join 2M+ shoppers on Desertcart.
Desertcart purchases this item on your behalf and handles shipping, customs, and support to Thailand.
♻️ Turn waste into wonder—fast, smart, and built to last!
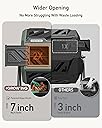
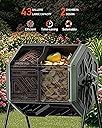
THEGROW'ING 43 Gallon Compost Bin is a durable, dual-chamber tumbling composter designed for fast assembly and continuous composting. Featuring an innovative internal nut system, it cuts setup time by 80%, while its built-in air vents and rotating design speed up decomposition. Crafted from BPA-free polypropylene and powder-coated steel, it withstands all weather conditions. With a large 43-gallon capacity and compact footprint, it’s the perfect eco-friendly solution for busy gardeners seeking efficient, year-round composting.


| ASIN | B0F1YBJ9QC |
| Best Sellers Rank | #9,211 in Patio, Lawn & Garden ( See Top 100 in Patio, Lawn & Garden ) #5 in Outdoor Composting Bins |
| Brand | THE GROW'ING |
| Brand Name | THE GROW'ING |
| Capacity | 43 Gallons |
| Color | Green |
| Customer Reviews | 4.3 out of 5 stars 355 Reviews |
| Item Dimensions L x W x H | 27"L x 25.2"W x 34.3"H |
| Item Weight | 9.59 Kilograms |
| Manufacturer | THE GROW'ING |
| Manufacturer Part Number | GS18011GN |
| Material | Polypropylene Plastic |
| Material Type | Polypropylene Plastic |
| Model Number | GS18011GN |
| Product Dimensions | 27"L x 25.2"W x 34.3"H |
| Shape | Hexagonal |
M**N
I love this composter, see assembly tips in my review
Just got it put together and placed in the yard. Have the browns in it for both sides, now just have to save up some greens. I like it so far. Here are some assembly tips A short product review is at the end, and will be updated as the composter is used for a time: Assembly TIP1: Putting it together: When just starting on the barrel it will save you a lot of frustration if you put it together on a table, or something almost eye level. I used a large chest freezer. This made it so much easier to get the screw holes to line up. and hold the parts in place till I started the screw. Assembly tip 2: When putting the first 4 panels together I temporarily put 2 screws in at the top to hold the panels B, and 2 H panels together to sturdy up the pieces, while I fastened the bottom of them to the side panel A. Assembly tip 3: It is much easier to make sure the center divider D stays aligned if you open the feeder doors on part B. I removed them entirely. This allowed me to reach inside to make sure the divider strayed on the grooves. Altogether it took me 45 minutes, from the time I opened the box, to the time it was in the yard. This includes unboxing, giving the instructions a glance(you know, cause I'm a guy and we don't need them), gathering my superior quality tools, and putting it all together. Assembly tip 4: You will have nuts and bolts left over, they are to replace the built in nuts that are encased in the plastic parts if needed. There are only to nuts you need to use=, they are the ones to hold the barrel on to the frame. Product review: I love the larger sliding doors which, as I mentioned, can be removed when emptying the compost. Most doors on other barrel composters are much smaller, unless you go up to the $300+ price range. It spins on a metal rod which is connected to a hollowed aluminum pole stand. The stand is more wobbly than I would like but it is holding up. If it fails I will just thread the rod through some concrete blocks. Looking at it you'd think wow I thought it would be bigger, because you can't imagine fitting 20 plus gallons per side. You can, trust me, I did the math, my wife says I'm not normal. So far I am very pleased with the quality, the size, and how easy it is to spin and fill.
B**R
Great product
Very sturdy bin. If you follow the instructions it’s easy to assemble it. They even provided the screwdriver and wrench. Highly recommend it.
C**C
Good quality tumbler - just need better assembly instructions
There have been a lot of comments about difficulty in putting this together. I agree that there are some challenges. Here are the problems I encountered and how I dealt with them. 1. There are several holes into which you insert screws to connect pieces together. In many of those holes, the plastic is not completely cleared, so it's not possible to insert the screws. I had to get a sharp tool (like an awl) to clear out the plastic from the holes first. I recommend checking all pieces and clearing the holes before trying to assemble anything. If you see a nut at the bottom of a hole but you can't see a clear path to the threads of the nut, then you need to clear out the plastic that's in the way. 2. Some of the outer holes in the panels (part H for me) weren't fully open. I used the included screwdriver to punch through them to make them large enough for the screws. I'm guessing the screw holes are part of the plastic mold instead of being drilled after the pieces were formed. That would explain why some extra plastic creeps into the area for the holes. 3. In the central divider are several humps that are supposed to hold nuts. You add a screw from the outside through the joint of two panels into the nut embedded in the hump. But one of mine was missing the nut and I didn't notice until I had most of the thing put together. I've added a picture showing the edge of the divider with the nut missing. Once I reread the second page of the instructions, I saw they do mention manually adding nuts if they have popped out. So I partially disassembled the tumbler and grabbed one of the smallest nuts and tried to insert it from the bottom (by "bottom", I mean the bottom of the slot just above my finger in the photo). It was not possible to do this with just my fingers, and I also couldn't do it using the supplied screwdriver. What worked is partially threading a screw into the nut so that the nut remains vertical. Then I pushed the nut into the slot with the screw remaining horizontal and sticking out towards me. I held the screw with my hand to keep the nut properly oriented, then pushed the nut in with the screwdriver until it clicked in place. I removed the screw and it was ready to go. 4. They supplied 3 different nuts. The largest obviously went with the largest bolts for attaching the tumbler to the frame. The smallest (5mm) can be used if a nut is missing in the central divider as I mention above. But there were a few 5mm nuts that were thicker than the rest and I'm not sure what they were for. I did not see anything in the instructions explaining them. I suppose it's possible they're what's needed if a nut is missing from one of the panels (instead of the central divider), but there are no instructions explaining this. I did not end up using these at all. All in all, I think the tumbler itself seems to be of decent quality and I look forward to using it. It was just a bit annoying to run into these issues that aren't well covered in the instructions.
K**G
Works like expected
Assembly is easy
M**.
Don't send your kitchen scraps to the dump! They still have value!!!
My partner and I love our composter! This is our third one as we filled both sides of our first one in a couple weeks (notes: we took in a couple loads of mulch when the county was trimming around the power lines and add 1 gallon per side/ 2 gallons ifvthe middle divider was left out. For anyone that wants mulch I've heard that most areas have a way to get it for free, especially from tree trimmers. We also are allowed to burn tree limbs here so we add about 1-2 gallons of ash to each batch depending on PH level along with an old pot or two of used plant dirt - for the microbes and then ALL the kitchen scraps for a few weeks - if u put in citrus rinds or old bread, throw them in a food processor and grind them up or chop the by hand into very small pieces - it speeds up the process. Also don't toss egg shells in without crushing them! The smaller the better since you want the calcium to spread out.) When we put our second one together we didn't put the middle divider in it and it works so much better, but we are composting in large batches in Florida heat & humidity. IMO, only use the divider if you are composting small amounts (i.e. you don't have a huge pile of mulch, a wood fireplace/fire pit with lots of ash, plant dirt that needs "refreshed" in you yard, or know someone who has large amounts of ingredients to give you - if you work in a kitchen or grocery store that throw out old produce that allow you to take it, for example, but be sure to ask first). Watch some YouTube Videos about these tumblers. They were an awesome help when getting started! NOTE: We tried to take the divider out of our first one and half the screws refused to come out. So basically, once it's put together, it's together! We are going to take a 4" drill head and make 4-6 holes in the divider so that the dirt can move from one side to the other. Haven't done it yet, but it's the best idea we've had so far. Also, for us the dirt isn't "soil" when we remove it. It's wet and clumpy, but we made 10'×10' bed to empty the composters in though half of that has been planted now. (We cheated here & bought 3-4 bags of packaged soil, lined the bed with about 4" of it and put the new compost on top. As you turn the new compost with the bagged soil the mircobes mix the two soils together and it helps break down the new stuff so much faster! And after a couple weeks in the sun and rain you can see all the dirt turn to nice dark, healthy soil. The important part is that all the veggies, fruit, bread, etc have broken down. The wood chips and egg shells take a lot longer to process, but that's good because they continue to add nutrients to the soil for 6+ months not just a 1-2 months. I've also started dumping my shreaded paper into the composter, but if I have a lot of shreaded paper I dump it on top the our 10' dirt square. In the composter it takes 4-7 days to break down so don't worry about it getting tangled on the metal bar. I'd only suggest spraying the paper a bit with the hose so it can break down. And any paper I put on the top of the 'dirt square' I spray down (or apply before a rain) and turn into the dirt about 12-24hrs later. No biggie if you wait longer. (One issue I have noticed it envolopes with plastic windows. Don't shread them and add them to the compost or you'll be adding more plastic to the food cycle.)
A**E
Easy to assemble, hard to turn/ rotate
Hard to grab to turn, won’t turn when full.
A**B
Super Easy to Use
Anyone else new to composting? I am and am so happy about this composter- such a great value for the money. I put it together myself- took about 45 minutes but I didn’t use the instructions. It is super sturdy and the perfect size for my backyard. After three weeks, I have vapor and hot compost!
C**E
Nice, well-made composting tumbler
I've seen videos of people with an open air pile of compost or just a bin that they have to stick a pitchfork in and turn and turn the pile or put in a corkscrew and stir it. Man - that seems terrible. This tumbler on the other hand is downright fun. It's kinda like spinning the wheel on Price is Right but at the end you get great compost. The build is sturdy and i was able to put it together myself though having more people probably would help. Very stable in my yard even when unevenly full. The orange color is beautiful and it looks really classy. It's only 43 gallons so you aren't going to get a half ton of compost but for small yards should be fine. We'll see how fast it gets results. THE BAD It's a tumbler so it just will never be as effective as a full sized ground unit. My compost has not gotten over 90 degrees so far but maybe it eventually will. Also you can never seem to get the openings to sit right on top so you can add water or material without having to balance it with your hand. A lock mechanism would have been great.
Trustpilot
2 months ago
3 days ago