

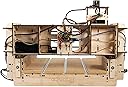

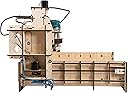
BobsCNC Quantum Mini CNC Router Kit with the Router Included (16" x 16" cutting area and 3.8" Z travel)
Product ID: 77262935
📏0.002” to 0.004” Repeatability
🔧5-Ply Baltic Birch Frame
⚙️NEMA 17 Stepper Motors
🚀 Elevate Your Crafting Game with Precision and Power!
The BobsCNC Quantum Mini CNC Router Kit is a high-performance, user-friendly CNC router designed for both hobbyists and professionals. With a robust 5-Ply Baltic Birch frame, a generous 16” x 16” cutting area, and precise NEMA 17 stepper motors, this kit ensures exceptional accuracy and durability. It comes complete with a Makita RT0701C Variable Speed Router and is compatible with GRBL1.1 firmware, making it an ideal choice for anyone looking to enhance their woodworking or crafting projects.
| ASIN | B01M7VBAQN |
| Batteries Included? | No |
| Batteries Required? | No |
| Customer Reviews | 4.1 4.1 out of 5 stars (197) |
| Date First Available | November 8, 2016 |
| Is Discontinued By Manufacturer | No |
| Item Package Quantity | 1 |
| Item Weight | 26 pounds |
| Item model number | E3 |
| Manufacturer | BobsCNC,LLC |
| Part Number | Evolution3V1 |
| Product Dimensions | 25 x 19 x 25 inches |
| Voltage | 115 Volts |
| Wattage | 600 watts |
C**Y
Its even better than it looks on the internet.
Received this machine and unpacked. Almost but not quite overwhelmed by the shear number of parts needing assembly. Took a deep breath and started. Some Comments on Machine Itself and Assembly This is not a toy and has many many parts. The assembled components appears to be more rigid than the smaller couple hundred dollar machine that I have inspected or are sold on Amazon. In assembly, FOLLOW THE INSTRUCTIONS page by page step by step. I usually assemble items using part intuition but do not try that with this item. The instructions are very detailed, each assembly step detailed with pictures of parts needed and steps to put together. I assembled my CNC E3 in about 11 hours including initiation of the software. Upon opening the shipment, I strongly recommend unpacking all the individual components, laying them out on a big table and comparing to number required in the instructions. I did not do that and found part way through I was missing a small part. Bob shipped it immediately but it still held me up a bit. Don't be frustrated if you are ending up missing something, this is a machine tool with lots of components and Bob will send you anything short within hours. The quality of the parts is excellent. Everything goes together with no force fit, it you have to force, stop and see what you did on preceding step because there is probably something wrong. This is a fairly robust CNC but it is not designed for industrial production. It will serve you well making home centered projects but it is not production quick. The assembly has almopst no slop in drive movement, if youo have some after completion, you can eliminate it by address the preload on the bearings. A simple task. The software recommended by BOBsCNC is freeware and quite adequate for the job. Instructions are minimal with the programs but there is a plethora of how to's you can access through Bob's site or Google. I used the time from when the machine was ordered to its delivery to download the three programs, create a project, convert it to g-code and then run on a machine simulation program. This last program showed the tool head movement as it completely simulated carving the project. BTW I have never programmed a CNC machine before. I am an industrial machine designer so I did not have to struggle too much with the whole project. However I did encounter a couple of steps that I had to stop and think through. If you have common sense and can follow instructions, you will have little if any problem taking your shop to a new level of capability. I would like to thank Bob for his quick response to my questions. It is such a pleasure to find a fairly complex machine made and sold in the USA that actually works, has high quality and has professional staff supporting it.
G**S
I can't say enough good about this kit!
I can't say enough good about this kit! I was a bit apprehensive at first, even after reading the online assembly manual. I should not have been worried...assembly was very easy. Almost all parts have tabs that fit into slots on the part it is being attached to. It's rock solid because the parts are also held together by a very adequate number of screws. All wooden parts are beautifully laser cut plywood (birch I think) and every part fit absolutely perfectly with its mate. You could tell that the designer had actually built the kit himself...there were no inaccessible screws or other parts. This is really a well thought out design. Note that EVERYTHING you need is in the kit: a DeWalt router, motors, electronics, even software for the controller. I'm not an experts but every part that I kner about personally was of good quality (for instance, the DeWalt router). Note that the assembly manual is a download from www bobscnc com. The assembly manual is really, really good, with at least one very clear picture for each assembly step and often 2, 3, or more. Any cons? Well, I ended up buying a DC motor control to adjust the speed of the router---30.000 RPM is too fast for aluminum, but be aware if you do this that power decreases as the router slows and you have to slow down feeds. Note that this is only needed it you are going to cut aluminum...30K RPM is fine for wood. One thing I would add. I've been wanting a CNC router for years but found other kits too expensive. I would have built one on my own but I didn't have the knowledge of the mechanical parts to tackle a design of my own. All the plans I bought and downloaded were too complex or too expensive. Building this kit gave me the knowledge of the mechanics of a CNC router and helped me understand just how all the mechanisms are integrated together. If I could do it over, I would buy this kit again without any hesitation at all.
P**I
Awesome product, top notch customer service from manufacturer!!
Amazing tool at an amazing price! I've wanted a cnc router for a long time, and when i came across this one i had to have it. The kit was really fun to put together, and even if you're not a very handy person with putting things together, Bob's instructions are the most detailed, easy to follow pland i've come across in a long time. Customer service: AAA++ I had a couple of questions when putting this together. I emailed Bob, and got a reply fast! Also, i messed up and ruined one of the belts. I emailed again asking about buying replacement parts. They sent me a replacement part by priority mail. Free of charge. Getting the unit up and running was easy, and it took me a couple of days fiddling around with designs and settings to get a good grip on it. (Being that this is my first CNC, i count this as a very good learning curve) Below is a pic of something i made with my neices and nephews for their parents anniversary.
B**S
COMPLETE WASTE OF MONEY
You can build this cnc for just over a 100$ less of the rotary tool. The instructions read like a ten yearold put them together and they arent complete. Cheap a$$ couldnt even include 35cents worth of limit switches to have some at the + and - ends of the axis. Nothing is labled you get a parts list but it doesnt do you any good. There is not enough loctite in the world to keep this plywood piece of crap from rattling itself apart. The X and Y axis were switched so when i sent it a program it was crashing into the side because left and right are the x not y. SHAME ON YOU BOB YOU HAVE TAKEN ADVANTAGE OF EVERY PERSON WHO HAS BOUGHT ONE. BUY ANY OTHER MACHINE. After two months of fighting with it i just threw it outside. The birds and squirrels havent had any luck getting it to work either
D**E
Great machine and even better customer support
I had never used a CNC machine before but have always enjoyed woodworking. I purchased this to try and get back into woodworking as it has been many years since I have taken the time to do this. This kit takes some time to build but by building it I learned more about it than if I had purchased a built machine. I had some issues and each time I asked a question I received a reply usually the same day. Never worked with a company with customer support like this one has. The freeware software was not working very well for me so I purchase some to make my set up of projects a little better and faster. I am now in the process of upgrading my shop area so I can do more as this has reignited my woodworking bug I had as a kid and in my early adult years. My plan has not been to turn this into a business but to give me something to do and help keep my sanity. The best part is I can build things I like and I have people reach out wanting to buy it or have me make them something, which is not why I got it but it is nice to sale a few pieces from time to time. I don't want it to become a business or something I have to do. This is a great machine to learn about the CNC world.
J**.
Good for engraving with good support but not for precision
This is a great starter machine and at reasonable cost for its size if you would like to engrave on wood or other soft materials. It is made of wood and precision suffers a lot because of the Z axis assembly that does not align with the Z axis shaft perfectly (more about this below) and because the whole router assembly flexes on the gantry. I checked to see if I did not tighten the tension rollers but that is not the problem. The rollers have some (very small) play on the rods that I cannot correct. The result is that when I send a set of commands in a G-Code file (more on this below) that will cut a square on acrylic by cutting 0.05 of an inch deep at 5 inches per minute (which is a very slow speed) , the corners are not perfectly 90 degrees because the router is not perfectly perpendicular when it changes direction due to the flex (more on accuracy below). If you are still interested in purchasing this machine, here is some info you may find useful but grab your coffee and get comfortable because this is going to be long. Assembly: Assembly took about 8 hours but don’t let that scare you at all. You will need a tabletop space of at least 35”x 35”. Almost all pieces are drilled in a way that you do not have to worry about left or right side so you should put all identical pieces together before you start. The only tools needed are a phillips screw driver, needle nose pliers and wire cutters. The assembly instructions posted on the Internet as a PDF at BobsCNC are most likely the best you have seen for a machine that comes in so many pieces. Use a tablet or a laptop to read the PDF from the screen instead of printing it. Follow the instructions and the pictures and you will find that there is not much there that leaves room for questions. During assembly, at no time I needed a second pair of hands or had to read a step twice because it was not clear. However, I found that you should pay attention to the following: 1) The wires connected to the switches cannot take much abuse and if you twist them enough, you will have to re-solder them to the switch. But once switches are mounted and the wires are wrapped and tie wrapped, they will not move any longer and this will be no problem. 2) There are 3 switches, 2 have the same length of wire and the third that goes all the way up by the Z axis motor has a much longer wire. Not sure if one of the other 2 switches should have a little longer wire and I got the wrong part but the wire from the X1 switch was too short and barely reaching the microcontroller when stretched so I had to extend it in order to wrap it nicely and route it alongside the other wires from the X1 side. 3) The Z axis motor and rod coupler is cut in a spiral to avoid off center movement but that does not help enough as I am unable to align the Z motor shaft with the Z threaded rod perfectly and you can see the motor (and a little the router) move back and forth while the router is moving up and down. That is very annoying and I believe that it can even affect accuracy (on deep cuts) since the router is slightly oscillating while it is moving up and down. Before you power up the CNC, make sure that the coupler does not show any uneven gaps in the spiral cut to avoid shaking too much. 4) In the assembly instructions pay extra attention to section 2 (Y Carriage Assembly) step 7 in page 14. There are 2 pieces that hold the belt ends on the back of the router assembly that you should make sure that the “teeth” cuts are on the upper side. If you put these on wrong, you will have hard time correcting them after the router assembly is mounted on the rails and you are about to put the belt on. 5) In page 54, it shows how to connect the stepper motors and switches. X2 will be the motor on the left side as you are looking at the machine from the back. On that side there are 2 motors, this is the one that is exactly opposite to X1. If you cross connect the X1 and X2, when later you “Home” the machine, the gantry assembly will run the opposite direction and there will be no switch there to stop it which will result in damage to the belts. If you see the gantry running away from home (Home is where the switches are mounted) you should unplug the USB cable from the computer to stop it before it reaches the end. 6) The spoil board I received was not square. As a result, I could not follow the instruction 9.4 on page 52. I contacted BobsCNC by sending a message via their website and got an answer via email within 1 hour on a Saturday. In the end I was told that they would send me a new board if I wanted but I was able to square put the board on squared to the machine frame so I am good for now. Yet, I was told that they do not cut the boards with a CNC and they only use a CNC to make the holes in it. This means that others may end up having the same issue. After assembly, you realize immediately that this machine needs plenty of space. I purchased a DeWalt stand and mounted a 36” by 36” tabletop on it. Then I made aluminum brackets that hold the router in place and mounted the laptop on an arm. Here are the main items I purchased among with some other minor things from a local hardware store. I used L shaped aluminum bars so I can lower the E2 CNC on them and held it tight in place while I can anytime just lift it off the table without the need of any tools. Also note that I routed the cabling away from the "Home" side of the router and made a small L shaped bracket out of aluminum to mount the power supply in a way that I can see the power light (see pictures). Finally, I used a spiral power cord and wrapped that around the router cable. Under the tabletop I mounted a power strip where I plugged in everything including a shop vac. DEWALT DW7350 Planer Stand with Integrated Mobile Base Rectangular Table Top with Black or Mahogany Reversible Laminate Top (Top Only) 36" x 36" 31177BP Key Locking Laptop Security Stand, Battery Pack Compatible Software: If you are new to CNC, here is how it works in a few words. You need 2 pieces of software: 1) You need an application that will allow you to design or import images of your designs so it can generate a G-Code file. Typically you would install this application on your desktop computer so you can design what you need to engrave or cut. There is plenty of software that will allow you to import your designs and some is free. The recommended F-Engrave works well for engraving but was not able to find an easy way for cutting although there may be a way and I am not familiar enough with it. I also found that F-Engrave has what seems to be a bug when I set the V-Carve to a straight cutter bit. The produced G-Code file for a square cut comes up empty. If you have more than just engraving in mind, you should really consider Fusion 360 which is cloud based and you can get a Hobbyist license for a year free with the ability to further renew also for free. If you learn how to design and machine objects in Fusion 360, you can handle any CNC project that comes to mind. The full version of Fusion 360 currently costs $300.00 per year and you will have to pay for that if you are not a start up or a hobbyist and your company makes more than $100,000 per year. 2) You need an application that will read the G-Code and send commands to the CNC machine. Typically you would install this on a laptop that you will plug the E3 USB interface to so you can have it by the CNC machine. A G-Code file contains simple commands in plain text that are nothing more than distance and direction commands telling the router which way to move. The suggested software that sends the commands to the CNC machine is UGS (Universal G-Code Sender) which is free and works well. NOTE: If you are going to use a laptop with a touch pad, you should disable the “Tap to Click” function from the touch pad properties because once you bring the Z axis to the desired “Zero” position, you may accidentally “Click” on more “Z-“ while moving the cursor away from the button and that will send the router right in your work piece. Accuracy: To elaborate on the bad accuracy of this CNC, consider the following G-Code that cuts a square 4" x 4". In this case while I am cutting 1/4 inch thick acrylic, when the router gets the command to change direction the cutter bit is not all the way to the edge due to the flex of the router and that results to a square with rounded and not 90 degree corners. Although the fault is about 0.05" to 0.1" it is significant if you consider a simple exercise as to cut 6 of these squares and then glue them with acrylic glue together to form a box. It will be impossible to form an "air tight" box even if you manage to put the pieces together in a way that the edges will meet enough to be glued. Even then, your box will not be a normal cube but more of a trapezoid cube that is easily identified as such by the naked eye. G90 (Absolute positioning) G20 (Values are in inches) G17 (XY selection) F5.00 (When the command is "G1" the speed of the movement, a.k.a "Feed Rate", will be 5" per minute) G0 Z0.0500 (Raise the Z axis 0.05" above zero, a.k.a "Z Safe") G0 X-2.0000 Y-2.0000 (Move X and Y to the lower left corner) G1 Z-0.0300 (Lower the Z axis 0.03" under the surface so the rest of the commands cut 0.03" deep) G1 Y2.0000 (Move Y to the upper left corner) G1 X2.0000 (Move X to the upper right corner) G1 Y-2.0000 (Move Y to the lower right corner) G1 X-2.0000 (Move X to the lower left corner which is the starting point) G1 Z-0.0600 (Move Z axis deeper to 0.06") ...The rest should repeat the same commands until the square is cut as deep as the thickness of the material Now, I found that the square comes out better if I write G-Code that cuts 4 straight lines lifting the Z axis at the end of each line but it is still slightly off square. I believe that the problem is with the following 3 factors: 1) The flex that exists because there is no meaningful way to tension the rollers on the bars. Even worst, the nuts of the adjustable rollers will dig in the wood and make a place for them that they tend to fall in every time you try to tension. Even if you manage to tension this machine correctly when you first put it together, as I did, it is inevitable that in the future you will need to re-tension the rollers but that will be very, very difficult to do. 2) The gantry does not sit perpendicularly to the X axis and that results in trapezoids. You can tell that it is off (if it is off on yours) by pushing the X axis all the way home and you will find that one side reaches the home before the other. To compensate for that, I push the gantry (X axis) tight to home and then power on the laptop which locks the motors and keeps the gantry squared. Even then, there was still a problem and I had to put a filler between the "home wall" and the gantry on one side because it was still off by 0.03". 3) No matter how much you tighten the rollers and the belts, you will not be able to stop all the flex due to the fact that this unit is made out of wood. ***Update 11/23/2017: I was finally able to cut perfect squares and circles on acrylic using these SHINA Titanium Coat Carbide End Mill Engraving Bits . These cutters are very sharp and cut acrylic without putting too much pressure on the router and the gantry. Still, I had to cut in 0.0300 increments and feed rate of 10 inches per minute which takes a lot of time for such a simple task*** So, if you want this machine to engrave words and shapes on wood, it may serve you well. If you need it like me to make precision cuts and precision engraving on acrylic or harder material, you should look elsewhere. Be aware that although you may be allowed to return this machine, they expect that you will disassemble it and re-pack it in its original condition which I think will take you another 8 hours to do. And since at the time of this review this is not a Prime item, you may have to pay to ship it back (Not clear on this).
G**G
The perfect way to wade into the wonderful world of CNC!
The E3 is the perfect path to the world of CNC for those who, like me, wouldn't take the plunge if it meant shelling out two grand or more just to get started. And assembling my own machine? It saved me hundreds of dollars while being fun, and provided quite a sense of satisfaction as I watched the router work its way through the first piece. I've had the E3 for about two months now, and I'm very pleased. It's a great fit for a guy who has a small shop, loves woodworking, and wants to be able to add that extra bit of special detail to his projects without justifying a huge expense. It's not for the faint of heart, though. There are over 250 small screws in the thing. And you'll need to learn how to use a few pieces of computer software (not included, but open source / free options are available). But there are a number of videos available, and the BobsCNC community is full of folks (including Bob!) who will help you in very short order if you get stuck. The attached picture is of one of my first projects. The morels were carved with a v-bit, and cleaned up with a straight bit (I then filled the carving with clear resin to create a smooth surface), and the holes were drilled with a tapered ball end mill (to match the tapered pegs). It's a great machine, and I'm very glad I took the plunge!
J**B
Perfect deaign, well priced
Absolutely exactly what i was looking for. I am an avid wood worker, electrical background (familiar with cad type programs and PLC's) and i wanted a CNC to help take my abilities to the next level. First off, the price is great. I did alotta research on CNC's under $1k, and most are China crap. Every review i seen on the E3 was great. (I did see some negative reviews on some cnc forums, however i believe they are 20+ year vets of CNC'ing and need more then this) When unboxing, i couldnt help but notice how wel packaged it was. Ordered it on a saturday, and i recieved it that next friday. 6 days from Missouri to Honolulu is pretty good. Assembly was a breeze. The instructions you download from BobsCNC website are step by step. Below Is a few tips: -DEFINATELY label each stepper motor cable end with a peice of tape and write on it X1,X2, etc. will make electronic's hook-up very easy. (Its what i did) After about 4 hours of building the machine, i was up and running. Did i mention i was BRAND new to cnc. This whole G-code bit is something new to me. I was having issues sending the program i built to the machine controller, i messaged Bob via the contact me section on his website, and boom, i was now a "CNC operator!" I was making a simple mistake, and wasnt "zeroing" the machine to the material. He was very fast in his response, which also foxed my problem. The problem was my un educated-ness. Today i have maxhined a few peices, testing feed rates, depths, different bits, etc. The machine is a very well designed peice of equipment. Through multiple errors on my programming, the machine held up to the bit being smashed into the bottom board, without the router on, i thought it was doomed. No issues. It also survived an accidental 1000 in feed rate. Haha OOPS. I am very happy with my purchase. All i want to do is design stuff and go make it. Thanks bob and the crew!
Trustpilot
3 days ago
2 weeks ago