Some deliveries may take a little longer than usual due to regional shipping conditions.

DOWNLOAD THE APP


Customer Services
Copyright © 2025 Desertcart Holdings Limited
DOWNLOAD THE APP

🖥️ Elevate your workspace, maximize your flow — because your desk deserves the upgrade!
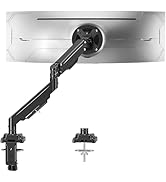
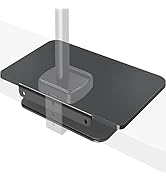
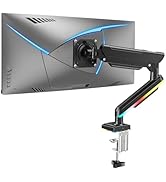
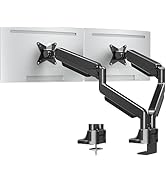
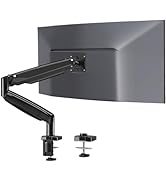
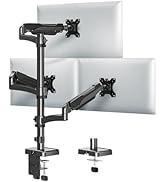
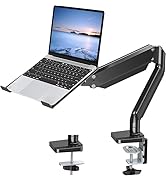
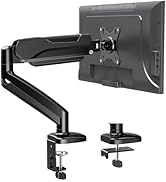
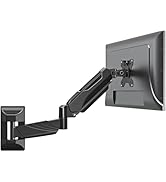
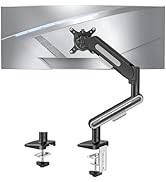
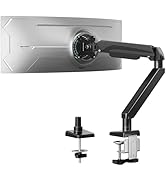
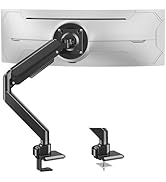
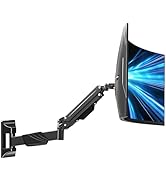
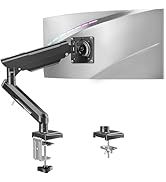
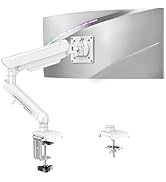
The MOUNTUP Single Monitor Desk Mount supports screens up to 32 inches and 17.6 lbs with universal VESA compatibility. It offers full-motion adjustability including 360° rotation, 180° swivel, and height adjustment up to 16.3 inches. Designed for easy, drill-free installation via clamp or grommet, it frees over 80% of desk space while securely holding your monitor with durable construction backed by a 3-year warranty.


| ASIN | B07Z7ZGHD5 |
| Best Sellers Rank | #13 in Computer Monitor Arms |
| Brand Name | MOUNTUP |
| Color Name | Black |
| Customer Reviews | 4.4 4.4 out of 5 stars (14,718) |
| Date First Available | October 17, 2019 |
| Item Weight | 4.18 pounds |
| Item model number | MU0004 |
| Product Dimensions | 4.41 x 9.45 x 16.85 inches |
A**K
Great Product
Very stable, nice size, easy to assemble, and great price! Definitely recommend
J**.
Great desk mount! Get this if you hate a cluttered desk!
I have a habit of using my desk for everything. It's my sewing workspace, TV stand, and my office desk--so I needed something good to mount my monitor on to save some valued space...and this mount did the job perfectly! My 21.7 inch ASUS monitor fits perfect on the mount, and it was easy to install. The range of motion on this made it a cinch to set it up exactly at the angle I needed. I clamped it to the diagonal side of my L-shaped desk that is pushed against the wall. It is definitely made well and highly sturdy! There are many different ways to adjust it that give you the precise tilt you need. Everything is included to put it together (screws, allen/hex wrenches, etc.), and the instructions are very detailed. Anyone can put this together fairly quickly, I think it took me about 10-15 minutes. I am now saving a lot more space and it makes my desk look so much better, too!
K**R
Surprisingly good for the price
I bought this monitor arm based on price and what I received is easily well beyond the price I paid. It's extremely sturdy, has great range of motion and was very easy to put together and adjust. The instructions were exceptionally well written and I had no problems getting it set up. The bonus was the optional hole mount and edge mounts being included so you could essentially put it wherever you needed it to be (except on the wall.) Once in place, it's very easy to adjust the tension on the joints so that the monitor is pretty much rock solid as it rests. I'm typing fairly hard to write this review and the monitor is not shaking at all (I opted for the hole mount) yet it's very easy to pull towards me or tilt. My only complaints are the practically non-existent cable management, though it's just enough to keep the wires off the desk, and the rotation joint/mount plate which is more stiff than the other joints such that it's a bit difficult to rotate it 90 degrees from landscape to portrait but it is doable. For $35 (the price as of this review) it's a steal. It's well made, solid, works well and is not $120! I liked it so much, I immediately bought a second one for my wife. I highly recommend this mount arm.
C**K
**⭐️⭐️⭐️⭐️⭐️ Neck‑Pain Cure and Desk Space Miracle in One Sleek Arm**
Mounting my 27‑inch monitor on the MOUNTUP gas‑spring arm instantly transformed both my workspace and posture. Assembly was refreshingly foolproof: tighten the heavy‑duty clamp to the back edge, snap the VESA plate onto the screen, and pop the arm into the base—total setup time was maybe fifteen minutes, Allen keys included. Once installed, the gas spring glides like a studio boom; with one fingertip I can raise the display for standing sessions, pull it forward for detail work, or pivot it 90° to portrait mode for coding marathons, and it stays locked exactly where I leave it. The built‑in tension adjustment dial let me fine‑tune the lift so the arm floats my 14‑pound monitor weightlessly, and the full 360‑degree rotation makes sharing the screen on Zoom calls as simple as a gentle spin. Cable management was clearly an afterthought on my old stand but is front‑and‑center here—the snap‑on channels hide every cord, so the desk surface finally looks photo‑ready, and the black powder‑coat finish blends seamlessly with my peripherals. After three weeks of daily use, I already feel the ergonomic payoff: no more hunching or stack‑of‑books risers, and my neck and shoulders thank me every evening. The freed‑up real estate beneath the monitor now fits my notebook, phone dock, and coffee mug with room to spare, effectively doubling my usable workspace. Whether you’re battling desk clutter, chasing the perfect viewing angle, or just want a mount that feels as solid and adjustable as units twice the price, the MOUNTUP arm delivers five‑star performance across the board.
L**T
I'll pull you closer but I won't overtighten
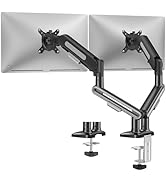
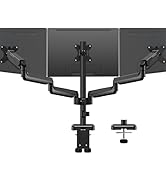
In a nutshell, I wanted to achieve three things with an arm-based monitor mount: First, I wanted my monitor lower. As the first picture (in the order I uploaded them) shows, my computer desktop is quite a bit above the keyboard drawer, and the stands that come with monitors raise them further still. But I need to look at the keyboard when I do my two-finger typing, and so I wanted the monitor closer to it. As the picture shows, the MOUNTUP allowed me to lower the monitor to where I wanted it. Second, I wanted my monitor closer to me. Due to cataract surgery combined with a particularly problematic eye, I cannot focus on different distances. When working on my computer, I wear reading glasses which allow me the sharpest vision at around 12 inch. The usual stands that monitors come with put the monitor well back from the edge of the desk top, and combined with the keyboard drawer, that is just too much. I needed my monitor hovering somewhere above the keyboard drawer, not recessed on the desktop. The MOUNTUP allowed me to do that too. (Another thing I did here is replace my 27 inch monitor, in which the far corners became quite unsharp if the center was in focus, by a smaller 22 inch one of the same resolution.) Third, when I sit back in my chair after leaning forward to type, I wanted to be able to draw the monitor closer to me to keep it in focus. The MOUNTUP also allowed me to do that. Some details how I set this up will be given later, but the second picture gives a top view of my setup. But first things first. I had quite a hard time figuring out *which* arm-based monitor stand to get, if *any*. If you read their low-rating reviews, all of them are full of stands doing things that they should not, without the user being able to fix it. (Eventually, it was a 5 star review by "Goortok" that convinced me that I should try the MOUNTUP.) I guess a lot of the negative reviews are user-caused. Not everybody has a feeling for how much turning force a screw can reasonably take, and/or may not know that if you exceed the maximum turning force, the screw will become looser instead of tighter, and that that is *irreversible*. Planning to tighten a screw to the most you can, and then come back is a definite no-no. And some of this is self-inflicted by the manufacturers. For example, the MOUNTUP instructions show everywhere the *long* arm of the hex keys being used to turn the screws, instead of the short arm. Even for the tiny, tiny, screws T1 and T2 that both secure the arms and provide friction against their turning in the horizontal direction! Not only are these screws tiny, they also rest on plastic. The users who adjust those stands may not have much technical insight. They may not realize that it is easy with a long arm to exert a lot more turning force than you would think. So show the short arm instead, and let people with arthritic hands figure out themselves that the long arm is easier! It is true that you cannot use the short arm on the biggest hex key, because there is a screwdriver point at the end of the long arm, but fortunately big screws are far more sturdy. Also, as seen in the second picture, the manufacturer put an incredibly ugly yellow sticker on the top arm, saying "Clockwise. Reduce tension. TO ADJUST THE ARM TENSION HERE. Counter-clockwise. Increase tension." I have mild hypertension, according to my inflatable arm gauge. Should I turn something clockwise? Myself? OK, I have a PhD in Aerospace Engineering, so with some thought I can guess that there probably is a spring or so inside the arm, and that that spring is probably compensating somehow for the weight of the monitor (and not for friction, say), and that it probably affects the arm, and not the wrist, and that somehow, unlike normal, the clockwise direction in this case loosens instead of tightens. (Unfortunately, I have a tendency to confuse clockwise and counter-clockwise, and left and right, anyway unless I happen to think twice.) Will everybody reason like this? If you *have* to have a sticker, why not say something straightforward like: "Turn the screw to + if the arm wants to sink due to the weight of the monitor. Turn to - if it wants to go up instead." And use a somewhat more discrete color than yellow, and put it on straight instead of skewed, please. Fortunately, I managed to slowly pull the sticker off, and a bit of Goo-Gone got rid of the remaining glue. The same for another yellow sticker that indicated the base of the lower arm. (I managed to initially put the lower arm on upside-down anyway, as I did not notice, or at least pay attention to the sticker.) Another issue is the stiffness of the "wrist". When I put my old 27 inch monitor on the stand, as in picture 2, it insisted strongly on rotating around this wrist to turn its screen to the floor. This was even though this monitor only weighed 9.8 lb (bare), a far cry from the 17.7 lb monitor capability claimed. And I needed to use a *big* amount of tightening of screw F to prevent it. The manufacturer should have provided a lot more friction against this predictable motion. I hesitate to consider the case that my monitor weighed 17.7 lb instead of 9.8. Maybe I would have destroyed screw F then. My new 22 inch monitor weighs only 5.4 lb, so after solving the 9.8 lb problem, this was a non-issue for me. (The instructions call screw F the "tilting bolt".) Still another issue is the attachment of the MOUNTUP to the desk. The mount includes a "clamp" for damage-free installation on the desktop. But, see the first picture, my desktop has a downward "lip" at the front, extending the 5/8 inch thick desktop wood downwards to about 2 inch. This lip is also 5/8 inch thick, and as picture 3 shows, the distance between the MOUNTUP clamp disk and the vertical clamp leg is only about 1/4 inch. So there is no way that the clamp could go around the lip. And the lip itself is much too thin and insecure to provide a safe anchoring point. Even if it was fortified, the distance between the bottom of the lip and the keyboard drawer is only 3+1/4 inch, too short to accommodate the screw part of the clamp. So it had to be a "grommet" installation, using a carriage bolt, which required me to drill a hole in the desk surface. I measured the bolt diameter to be slightly less than 5/16 inch with my caliper, so I drilled a 5/16 inch hole. But apparently the particle board had some spring in it, and the bolt had difficulty going through the hole freely. Since I still wanted the hole to be tight for maximum security, I went through it a few more times with the 5/16 inch drill bit, rather than swap in a 3/8 bit. I then secured the base of the mount as instructed using the provided bottom plate (the side of the clamp really), and the provided wing nut. I tightened the wing nut well, and it seems secure, but if it comes loose, I will put some Titen Blue threadlocker on the inside of the nut before putting it back. (I did not think of doing so when I installed it, otherwise I would have.) One other detail: the carriage bolt was so long that it would have stuck out far below the desktop lip. So I cut it down. First I tried a dremel with a cutting wheel, but that was a mess. A simple hacksaw turned out to work much better. Make sure to have the wingnut all the way on the bolt before sawing, in case you damage the thread a bit. (I did not, until I filed the burrs away.) And still another issue. The back of my old 27 inch monitor was flat over the VESA area were the stand attaches. But the back of my new 22 inch monitor was not, it curved away where the top two VESA plate screws attached. So I used two of the longer provided VESA plate screws here, and that left a gap. (You get 8 plastic washers, but they are all the same thickness and rigid, so that makes them pretty useless.) If you do leave a gap, make sure you do not overtighten the screws with the gaps, or you *are* going to break something. If you are concerned about security in the presence of vibration, use some Titen Blue. (See the Goortok review for other VESA issues.) I may also mention that if you want to rotate the monitor so that its long side is vertical instead of horizontal, you will need a lot of force, and this is not adjustable, as far as I see (unless maybe you take the wrist apart). So this is probably not something you want to do frequently. I never could do this, so I will not miss it. (The instructions say to call the manufacturer if it is a problem. By all means do, and let them suffer too.) Next for how I set up things to be able to pull the monitor closer to me without undesired side effects. I first experimented on my dining table, using the clamp, since I did not want to keep drilling holes in my computer desktop. Picture 2 shows the setup from above (with my old 27 inch monitor). By tightening the tiny screw T2 more than T1, I achieved that the two arms would rotate as a single unit around the base. (Note that both screws need to be at least tight enough that the arms do not come loose when the stand or monitor is accidentally hit from below.) To get minimal sideways motion while you are pulling the monitor towards you, you want the wrist screw H to be even with the point on the base that the arms rotate around when seen from above. The picture shows H to be a bit higher, but that is OK since ideally they should be even halfway the motion towards you. (In my final installation, picture 4, in which I always wanted the screen somewhat in front of the desktop, I approximated the ideal by installing the base as close to the edge of the desktop as I could.) Note that in rotating around the base, the monitor screen will want to start pointing a bit to the right. I think I loosened the wrist screw H just a little bit to allow me to easily correct for this while pulling. There is one other thing you can adjust. You can further reduce the sideways motion as well as the angular motion of the screen by making the horizontal distance between screw H and the base, as seen from above, larger. That you can do if you increase the angle between the arms before tightening screw T2. In my final installation, picture 4, I installed the base as far to the right as I could to get the maximum distance. (After picture 4 was taken, I ducted the HDMI cable from my computer through the cable ducts on the arms. You definitely want to read the instruction before doing so. If you have arthritic hands, you may want to ask someone to help you. The power cable and the audio cable to my speakers go straight back and are better left free.) The bottom line is that the MOUNTUP *does* allow me to lower my monitor and move it closer to where I wanted it. And it *does* allow me to draw it still closer without problems. It also clears a considerable amount of desktop space where the old stand used to be. In addition the stand is sturdy. IIRC, some reviewer complained about vibration, but I cannot reproduce that. If I hit the desk surface right next to where the stand is mounted, the monitor will vibrate a couple of times, but this seems to be due to vibration of the desk surface, not the mount. Also, I have zero problems with things coming loose or unintended motions. So far, this was a great buy. Picture 5 gives the product dimensions from the instructions, which you might want to see before ordering instead of after.
I**N
I was initially a bit concerned when ordering this product, as I had to install it on the side of my table and couldn't find any pictures or videos demonstrating side installation. However, upon receiving it, I was very pleased to find that the installation process was straightforward and the functionality excellent. The quality is outstanding, with multiple adjustment options, and it looks great overall.
J**G
It is advertised that it is capable of holding up to 32 inches and 17.6 lbs, but after my installation of a 31'5 inch 16.5 lbs monitor. The arm is strong I agree but the Screen tilt axel is not strong enough that the screen constantly turns downwards after I have turn the screw till I am totally unable to after using my entire body weight.
R**Y
المنتج ممتاز برجاء ارسال فاتورة للضروره
E**O
Exvelente, facil de montar
E**Z
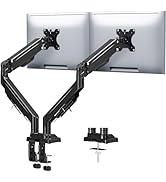
Ich habe mein Home-Office mit dieser MOUNTUP-Halterung für zwei 27-Zoll-Monitore (ca. 5,5 kg pro Monitor) aufgerüstet. Hier sind die entscheidenden technischen Aspekte für potenzielle Käufer: Montage und Stabilität: Die Installation via Tischklemme (C-Clamp) ist massiv ausgeführt und hält an meiner 25 mm starken Schreibtischplatte absolut sicher. Die Gelenke wirken hochwertig verarbeitet. Ein wichtiger Hinweis: Die Gasdruckfedern müssen initial auf das Gewicht der Monitore eingestellt werden. Entgegen einiger Rezensionen lassen sie sich sehr präzise justieren, man benötigt jedoch einige Umdrehungen, bis der Haltepunkt exakt erreicht ist. Beweglichkeit: Die Neigungs- und Schwenkfunktionen sind leichtgängig, sofern man die Schrauben nicht zu fest anzieht. Das Switchen zwischen Hoch- und Querformat (Rotation) funktioniert ohne Werkzeug, was für Software-Entwickler oder Grafikdesigner ein großer Pluspunkt ist. Kabelmanagement: Die integrierten Kabelführungen aus Kunststoff halten die Kabel sauber am Arm. Bei zwei dicken DisplayPort-Kabeln plus Stromversorgung wird es jedoch etwas eng – hier wäre ein Millimeter mehr Spielraum wünschenswert gewesen. Pro: Hohe Tragkraft (bis 10 kg pro Arm realistisch). Sehr gute Platzersparnis auf dem Schreibtisch. Werkzeug für die Justierung im Lieferumfang enthalten. Contra: Die Justierung der Federkraft erfordert zu Beginn etwas Geduld. Kabelführungen bei Vollauslastung etwas knapp bemessen. Fazit: Eine technisch ausgereifte Lösung für ein Dual-Monitor-Setup. Besonders die Flexibilität der Gasdruckfedern überzeugt in dieser Preisklasse. Wer Wert auf einen aufgeräumten Schreibtisch legt, macht hier nichts falsch.
Trustpilot
2 weeks ago
3 days ago